linux
Mobotix Notifier in Python – get desktop messages from your cameras
I wrote a little code in python to act as a persistent, small footprint LAN listener for Mobotix cameras IP Notify events. If such a thing is useful to you, the code and a .exe compiled version are linked/inline. It works on both Windows and Linux as python code. For Windows there’s a humongous (14MB) .exe file use if you don’t want to install Python and mess with the command line in power shell.
Mobotix cameras have a pretty cool low-level feature by which you can program via the camera web interface a raw IP-packet event to send to a destination if the camera detects a trigger, for example motion, PIR over threshold, noise level, thermal trigger, or the various AI detectors available on the 7 series cameras. Mobotix had a simple notification application, but some of these older bits of code aren’t well supported any more and Linux support didn’t last long at the company, alas. The camera runs Linux, why you’d want a client appliance to run anything but Linux is beyond me, but I guess companies like to overpay for crappy software rather than use a much better, free solution.
I wanted something that would push an otherwise not intrusive notification when the camera triggered for something like a cat coming by for dinner, pushing a desktop notification. Optimally this would be done with broadcast packets over UDP, but Mobotix doesn’t support UDP broadcast IP Notify messaging yet, just TCP, so each recipient address (or DNS name) has to be specified on each camera, rather than just picking a port and having all the listeners tune into that port over broadcast. Hopefully that shortcoming will be fixed soon.
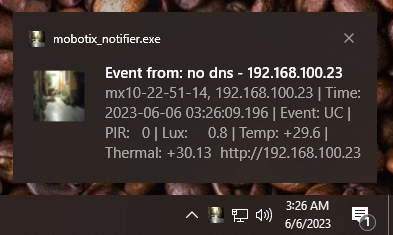
This code runs headless, there’s no interaction. From the command line just ./mobotix_notifier.py & and off it goes. From windows, either the same for the savvy or double click the exe. All it does is listen on port 8008/TCP and if it gets a message from a camera, reach out and grab the current video image, iconify it, then push a notification using the OS’s notification mechanism which appears as a pop-up window for few seconds with a clickable link to open the camera’s web page. It works if you have one or a 100 cameras, but it is not intended for frequent events which would flood the desktop with annoyance, rather a front door camera that might message if someone’s at the door. In a monitoring environment, it might be useful for signaling critical events.
Mobotix Camera Set Up
On the camera side there are just two steps: setting up an IP-Notify action from the Admin Menu and then defining an Action Group from the Setup Menu to trigger it.

The title is the default “SimpleNotify” – that can be anything.
The Destination addresses are the IPs of the listener machines and port numbers. You can add as many as needed but for now it is not possible to send a UDP broadcast message as UDP isn’t supported yet. It may be soon, I’ve requested the capability and I expect the mechanism is just a front end for netcat (nc) as it would be strange to write a custom packet generator when netcat is available. For now, no broadcast, just IP to IP, so you have to manually enumerate all listeners.
I have the profile set for sequential send to all rather than parallel just for debugging, devices further down the list will have lower latency with parallel send.
The data protocol is raw TCP/IP, no UDP option here yet…
The data type is plain text, which is easier to parse at the listener end. The data structure I’m using reads: $(id.nam), $(id.et0) | Time: $(fpr.timestamp) | Event: $(EVT.EST.ACTIVATED) | PIR: $(SEN.PIR) | Lux: $(SEN.LXL) | Temp: $(SEN.TOU.CELSIUS) | Thermal: $(SEN.TTR.CELSIUS) but it can be anything that’s useful.
Mobotix cameras have a robust programming environment for enabling fairly complex “If This Then That” style operations and triggering is no exception. One might reasonably configure the Visual Alarm (now with multiple Frame Colors, another request of mine, so that you can have different visual indicators for different detected events, create different definitions at /admin/Visual Alarm Profiles), a fairly liberal criterion might be used to trigger recording, and a more strict “uh oh, this is urgent” criterion might be used to trigger pushing a message to your new listeners.
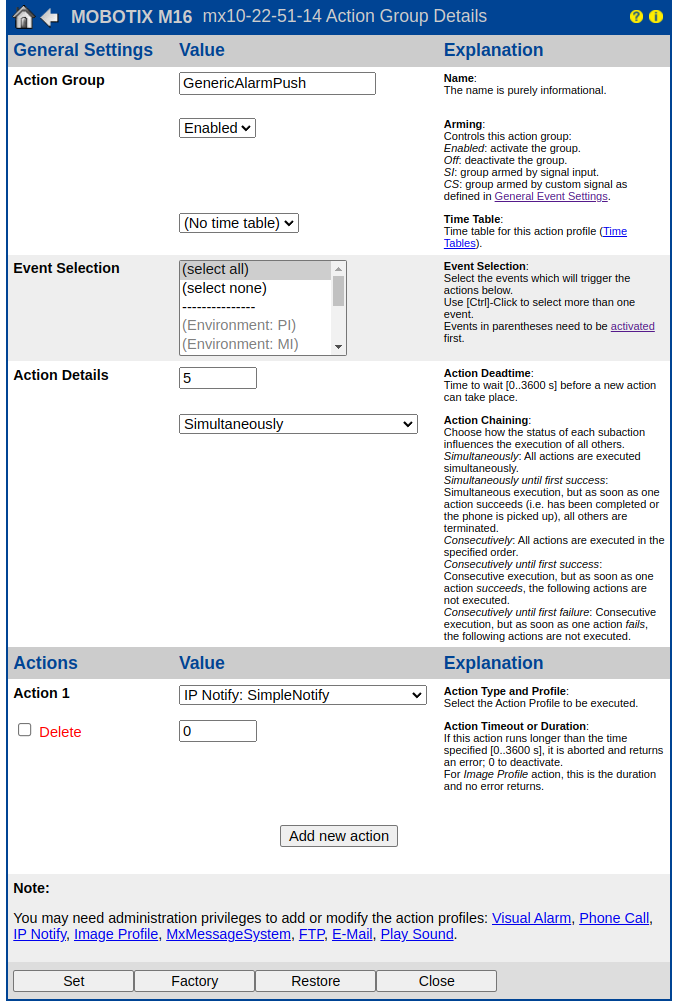
This config should be fairly obvious to anyone familiar with Mobotix camera configuration: it’s configured to trigger at all detected events but not more than once every 5 seconds. given it is pushing a desktop alert, a longer deadtime might be appropriate depending on the specifics of triggering events that are configured.
That’s all that’s needed on the camera end: when a triggering event occurs the camera will take action by making a TCP connection to the IP address enumerated on the selected port and, once the connection is negotiated push the text structure. All we need now is something to listen.
Python Set Up
The provided code can be run as a python “application” but python is an interpreted language and so needs the environment in which to interpret it properly configured. I also provide a compiled exe derived from the python code using PyInstaller, which makes it easier to run without Python on Windows where most users aren’t comfortable with command lines and also integrates more easily with things like startup applications and task manager and the like.
If you’re going to run the python command-line version, you can use these instructions for Windows, or these for Linux to set up Python. Just make sure to install a version more recent than 3.7 (you’d have to work at installing an older version than that). Then, once python is installed and working, install the libraries this script uses in either windows powershell or Linux shell as below. Note that python specifies the 3.x series of python vs. 2.x and is only necessary in systems with earlier version baggage like mine.
python[3] -m pip install plyer dnspython py-notifier pillow --upgrade
Once python is installed, you should be able to run the program from the directory by just typing ./mobotix_notifier.py, obviously after you’ve downloaded the code itself (see below).
Firewalls: Windows and Linux
Linux systems often have Uncomplicated Firewall (UFW) running. The command to open the ports in the firewall to let any camera on the LAN reach the listener is:
sudo ufw allow from 192.168.100.0/24 proto tcp to any port 8008
# if you make a mistake
sudo ufw status numbered
sudo ufw delete 1
This command allows TCP traffic in from the LAN address (192.168.100.0/24, edit as necessary to match your LAN’s subnet) on port 8008. If a broadcast/UDP version comes along, the firewall rule will change a little. You can also reduce the risk surface by limiting the allowed traffic to specific camera IPs if needed.
On windows, the first time the program is run, either the python script or the executable, you’ll get a prompt like
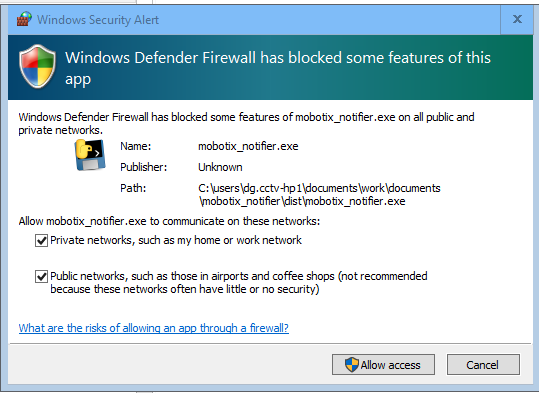
You probably don’t need to allow public networks, but it depends on how you’ve defined your network ranges whether Windows considers your LAN public or private.
Default Icon Setup
One of the features of the program is to grab the camera’s event image and convert it to the alert icon which provides a nearly uselessly low rez visual indicator of the device reporting and the event that caused the trigger. The icon size itself is 256×256 pixels on linux and 128×128 on windows (.ico). Different window managers/themes provide more or less flexibility in defining the alert icons. Mine are kinda weak.
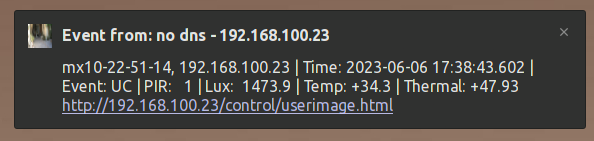 The win-10 notification makes better use of the icon. Older versions of linux had a notification customization tool that seems to have petered out at 16.x, alas. But the icons have some detail if your theme will show them.
Another feature is that the code creates the icon folder if it doesn’t exist. It almost certainly will on Linux but probably won’t on windows unless you’ve run some other Linuxy stuff on your windows box. The directory created on windows is your home directory\.local\share\icons\. On Linux systems, the directory should exist and is ~/.local/share/icons/. In that directory you should copy the default camera icon as “mobotix-cam.ico” like so:

You can put any icon there as your preferred default as long as it is in .ico format, or use the one below (right-click on the image or link and “save as” to download the .ico file with resolution layers):
If, for some reason, the get image routine fails, the code should substitute the above icon so there’s a recognizable visual cue of what the notification is about.
mobotix_notifier.py code
The python code below can be saved as “mobotix_notifier.py” (or anything else you like) and the execution bit set, then it can be run as ./mobotix_notifier.py on Linux or python .\mobotix_notifier.py on Windows. On Linux, the full path to where you’ve installed the command can be set as a startup app and it will run on startup/reboot and just listen in the background. It uses about 13 seconds a day of CPU time on my system.
Click to download the Windows .exe which should download as mobotix_notifier.exe. (14.0MiB) After the above configuration steps of on the camera(s) and firewall are completed it should start silently and run in the background after launch (kill it with task manager if needed) and push desktop alerts as expected. I used “UC” alarms to test rather than waiting for stray cats.
The python code is:
#!/usr/bin/env python3

import requests
from PIL import Image
import socket
from plyer import notification
import io
import os.path

# note windows version needs .ico files
# note windows paths have to be r type to handle
# backslashes in windows paths
# Check operating environment and define path names
# for the message icons accordingly.
# if OS path doesn't exist, then create it.

if os.name == "nt":
    Ipath = r"~\.local\share\icons\mobotix-cam.ico"
    Epath = r"~\.local\share\icons\mobotix-event.ico"
    fIpath = os.path.expanduser(Ipath)
    fEpath = os.path.expanduser(Epath)
    dirpath = os.path.dirname(fEpath)
    if not os.path.exists(dirpath):
        os.makedirs(dirpath)

else:
    Ipath = "~/.local/share/icons/mobotix-cam.png"
    Epath = "~/.local/share/icons/mobotix-event.png"
    fIpath = os.path.expanduser(Ipath)
    fEpath = os.path.expanduser(Epath)
    dirpath = os.path.dirname(fEpath)
    if not os.path.exists(dirpath):
        os.makedirs(dirpath)


def grab_jpeg_image(camera_ip):
    """Grabs a JPEG image from the specified camera IP."""

    # Make a request to the camera IP
    response = requests.get(f"http://{camera_ip}/control/event.jpg", stream=True) # noqa

    # Check if the request was successful
    if response.status_code == 200:
        # Convert the response data to an image
        image = Image.open(io.BytesIO(response.content))

        # Return the image
        return image

    else:
        # import the default icon
        image = Image.open(fIpath)

        # Return the image
        return image


def convert_jpeg_to_png(image, width, height):
    """Converts a JPEG image to a PNG image."""

    # size = width, height

    # Scale the image
    image.thumbnail((width, height), Image.Resampling.LANCZOS)

    # Save the image according to OS convention
    if os.name == "nt":
        icon_sizes = [(16, 16), (32, 32), (48, 48), (64, 64), (128, 128)]
        image.save(fEpath, format='ICO', sizes=icon_sizes)
    else:
        image.save(fEpath)


def iconify(src_ip):

    # Grab the JPEG image from the camera
    image = grab_jpeg_image(src_ip)

    # Convert the JPEG image to a PNG image
    convert_jpeg_to_png(image, 256, 256)


def reverse_dns_lookup(src_ip):

    try:
        return socket.gethostbyaddr(src_ip)[0]
    except socket.gaierror:
        return "no dns"
    except socket.herror:
        return "no dns"


def test_str(answer):
    try:
        return str(answer)
    except TypeError:
        return answer.to_text()


def listener():
    """Listens for incoming connections on port 8008."""

    # Create a socket
    sock = socket.socket(socket.AF_INET, socket.SOCK_STREAM)
    sock.setsockopt(socket.SOL_SOCKET, socket.SO_REUSEADDR, 1)

    # Bind the socket to port 8008
    sock.bind(("0.0.0.0", 8008))

    # Listen for incoming connections
    sock.listen(1)

    while True:
        # Accept an incoming connection
        conn, addr = sock.accept()

        # Receive the payload of the packet
        data = conn.recv(2048)

        # Close the connection
        conn.close()

        # convert from literal string to remove b' prefix of literal string
        data = str(data)[2:-1]

        # Extract the source IP from the address
        src_ip = addr[0]

        # Grab the event image as an icon
        iconify(src_ip)

        # Do a DNS lookup of the source IP
        answer = reverse_dns_lookup(src_ip)

        # Get the hostname from the DNS response
        hostname = test_str(answer)

        # Write the hostname to notify-send

        title = (f"Event from: {hostname} - {src_ip}")
        message = (f"{data} http://{src_ip}/control/userimage.html")

        notification.notify(
            title=title,
            message=message,
            app_icon=fEpath,
            timeout=30,
            toast=False)

        # Echo the data to stdout for debug
        # print(f"Event from {hostname} | {src_ip} {data}")


if __name__ == "__main__":
    listener()
Please note the usual terms of use.
Tagging MP3 Files with Puddletag on Linux Mint
A “fun” part of organizing an MP3 collection is harmonizing the tags so the datas work consistently with whatever management schema you prefer. My preference is management by the file system—genre/artist/year/album/tracks works for me—but consistent metainformation is required and often disharmonious. Finding metaharmony is a chore I find less taxing with a well structured tag editor and to my mind the ur-meta-tag manager is MP3TAG.
The problem is that only works with that dead-end spyware riddled failing legacyware called “Windows.” Fortunately, in Linux-land we have puddletag, a very solid clone of MP3TAG. The issues is that the version in repositories is (as of this writing) 1.20 and I couldn’t find a PPA for the latest, 2.0.1. But compiling from source is super easy and works in both Linux Mint 19 and Ubuntu 20.04 and version 2.20 on 22.04 which contains my mods to latinization of foreign scripts (yay open source!):
- Install pre-reqs to build (don’t worry, if they’re installed, they won’t be double installed)
- get the tarball of the source code
- expand it (into a reasonable directory, like ~/projects)
- switch into that directory
- run the python executable “puddletag” directly to verify it is working
- install it
- tell the desktop manager it’s there – and it should be in your window manager along with the rest of your applications.
The latest version as of this post was 2.0.1 from https://github.com/puddletag/puddletag
sudo apt install python3-pyqt5 python3-pyqt5.qtsvg python3-pyparsing python3-mutagen python3-acoustid libchromaprint-dev libchromaprint-tools libchromaprint1
wget href="https://github.com/puddletag/puddletag/releases/download/2.0.1/puddletag-2.0.1.tar.gz
tar -xvf puddletag-2.0.1.tar.gz
cd puddletag-2.0.1/
cd puddletag
./puddletag
sudo python3 setup.py install
sudo desktop-file-install puddletag.desktop
A nice feature is the configuration directory is portable and takes your complete customization with you – it is an extremely customizable program so you can generally configure it as fits your mental model. Just copy the entire puddletag directory located at ~/.configure/puddletag.
Successful connect to WPA2 with Linux Mint 17
I found myself having odd problems connecting to WPA2 encrypted wireless networks with a new laptop. There must be more elegant solutions to this problem, but this worked for me. The problem was that I couldn’t connect to a nearby hotspot secured with WPA2 whether I used the default config tool for mint, Wicd Network Manager, or the command line. Errors were either “bad password” or the more detailed errors below.
As with any system variation mileage may vary, my errors look like:
wlan0: CTRL-EVENT-SCAN-STARTED
wlan0: SME: Trying to authenticate with 68:72:51:00:26:26 (SSID='WA-bullet' freq=2462 MHz)
wlan0: Trying to associate with 68:72:51:00:26:26 (SSID='WA-bullet' freq=2462 MHz)
wlan0: Associated with 68:72:51:00:26:26
wlan0: CTRL-EVENT-DISCONNECTED bssid=68:72:51:00:26:26 reason=3 locally_generated=1
and my system config is reported as:
# lspci -vv |grep -i wireless
3e:00.0 Network controller: Intel Corporation Wireless 7260 (rev 6b)
 Subsystem: Intel Corporation Dual Band Wireless-AC 7260
# uname -a
Linux dgzb 3.16.0-38-generic #52~14.04.1-Ubuntu SMP Fri May 8 09:43:57 UTC 2015 x86_64 x86_64 x86_64 GNU/Linux
I found useful commands for manually setting up a wpa_supplicant.conf file here, and for disabling 802.11n here. The combination was needed to get things working.
The following successfully connects to a WPA2-secured network:
$ sudo su
$ iw dev
 ... Interface [interfacename] (typically wlan0, assumed below)
$ iw wlan0 scan
 ... SSID: [ssid]
 ... RSN: (if present means the network is secured with WPA2)
$ wpa_passphrase [ssid] >> /etc/wpa_supplicant.conf
...type in the passphrase for network [ssid] and hit enter...
$ sh -c 'modprobe -r iwlwifi && modprobe iwlwifi 11n_disable=1'
$ wpa_supplicant -i wlan0 -c /etc/wpa_supplicant.conf
(should show CTRL-EVENT-CONNECTED)
(open a new terminal leaving the connection open, ending the command disconnects)
$ sudo su
$ dhclient wlan0
(should be connected now)
IBM BoMC on the Fritz
I was updating the firmware of our servers with IBM’s Bootable Media Creator – it is usually a great tool: it builds a bootable linux disk with all the latest firmware patches for your system – or all IBM systems if you want with a small utility that fetches all the latest updates for you and assembles them into an .iso.

The current version is ibm_utl_bomc_2.10_windows_i386.exe, but when you run it, it fails when it gets to uncompressing ibm_utl_boot_tools-130_anyos_x86-64-mid.zip (probably ibm_utl_boot_tools-130_anyos_x86-64-full.zip too, if you need that for your system instead). I finally noticed v130 was only 4mb and my old V110 was 65MB.
The util only downloads about 500k of each binary patch each time it is run. Fortunately, the efforts are cumulative. Unfortunately any driver bigger than about 1MB is effected and will not download completely the first time. Or the first 2x(size in mb) times. If you run ibm_utl_bomc_2.10_windows_i386.exe -m 8863 -l C:\temp from the command line (as an example, assuming your machine type is 8863) TWICE and the second time you don’t see something like:
(1 of 8) Acquiring ibm_fw_diag_zuyt38a_linux_i386...

Already downloaded.
for any driver, then it isn’t fully downloaded. Keep repeating. I wrote a script to automate the process and put about 100 repetitions of the command in the batch and went out to dinner. When I got back, all the drivers were reporting “already downloaded.”
@echo off

SET LOOP=0

ibm_utl_bomc_2.10_windows_i386.exe -m 8863 -l C:\temp

[copy and paste this or use a do loop to repeat 100x]

:END

Linux 342
An IBM 342 with a ServeRAID 4lx is a fine machine, but getting Linux to install is less the effortless. Emacs!

I’m trying to get zoneminder to work on this very nice IBM 342 with a serve raid card and some good drives and 3 video capture cards. The thing should be able to capture 12 streams of video simultaneously, or 6 at full 30FPS. But getting Linux variants to properly recognize the serveraid card is a challenge.
The Mandrake LiveCD install works great on IDE systems, no problem at all. But it doesn’t see the serveraid, so that one was out. Gentoo saw the serveraid card, and since video capture and real time analysis is one of those things that would be good to do fast, the gentoo optimization scheme seemed promising, but it wasn’t. Just a miserable series of failed compiles and fixes that went on endlessly.
So from there to Debian, which is very nice and since it is the parent of Ubuntu and there’s an Ubuntu package and Carolyn loves Ubuntu, that seemed worth a shot. It does see the Serveraid, but there seems to be a bug in the IPS.o driver which reared it’s irritating head during package installs causing hangs, even after I updated the firmware to 7.12.12.
So that was out. On to a distro officially supported by IBM: Suse. That installed great, easy no problem, detected all the ADCs on the capture cards and everything. Very easy to install, but there are some weird bugs with ffmpeg that hung the compile of Zoneminder. It descended into another endless series of patch and edit and retry effort to get through the compile….
Then I saw that Fedora 7 has an RPM in the main distro for ZoneMinder. It is officially supported by IBM and seems rock solid. So far the network install has gone well – the install CD is only 7.71 MB (!) and it seems tentatively promising… it’s on the “Starting install process” screen, which is supposed to take several minutes. As it may need a few GB of data, I’ll give it some time. Unfortunately Fedora doesn’t support CD installs and the 342 has a laptop style CD-ROM drive, so doing a DVD install is out of the question. Network installs are efficient if you only have to do them once, but the retry is all penalty download.