driver
Low Voltage LED Lighting
My kitchen has had halogen lighting for 20 years, from back when it was a slightly more efficient choice than incandescent lighting and had a pleasing, cooler (bluer, meaning the filament runs hotter) color temperature.

Progress has moved on and while fluorescent lights still have a lead in maximum luminous efficacy (lm/w), for example the GE Ecolux Watt-Miser puts out 111 lm/W, they’re less versatile than LEDs and installation is a hassle while low voltage LEDs are easy to install and look cool.
System Design
The goal of this project was to add dimmable, pleasing light to the kitchen that I found aesthetically interesting. I wanted a decent color rendering index (CRI), ease of installation, and at reasonable cost. I’ve always liked the look of cable lighting and the flexibility of the individual, adjustable luminaires.
I couldn’t find much information on how variable output LEDs work and what can be used to drive them. I have a pretty good collection of high quality power supplies, which I wanted to take advantage of, but wasn’t sure if I’d be able to effectively dim the bulbs from the documentation I found. So I did some tests.
Test Configuration
I bought a few different 12V, Dimmable LEDs and set up a test configuration to verify operation and output with variable voltage and variable current. The one bit of data I had was that using standard commercial controllers, the lowest output is typically stated to be around 70% of maximum output: that is the dimming range is pretty limited with standard (PWM/Transformer) controllers. The results I found were much more encouraging, but revealed some quirks.
I used a laboratory-grade HP power supply with voltage and current control to drive the LEDs, decent multimeters to measure voltage and current, and an inexpensive luminance meter to measure LED output.
I measured 3 different LEDs I selected based on price and expected compatibility with the aesthetics of the project and because they looked like they’d have different internal drivers and covered a range of rated wattage.
Test Results
These bulbs have internal LED controllers that do some sort of current regulation for the diodes that results in a weird voltage/current/output response. Each bulb has a different turn-on voltage, then responds fairly predictably to increasing input voltage with increasing output, reaches the controller stabilizing voltage and runs very inefficiently until voltage gets over the rated voltage and then becomes increasingly efficient until, presumably, at some point the controller burns out. I find that the bulbs all run more efficiently at 14V than at the rated 12V.
As a side note, to perform the data analysis, I used the excellent xongrid plugin for excel to perform Kriging interpolation (AKA Gaussian process regression) to fit the data sets to the graphing function’s capabilities. The graphs are generated with M-Chart and the table with TablePress.
Watts v. Volts
This chart shows the wattage consumed by each of the three LEDs as a function of input voltage, clearly demonstrating both that the power consumption function is non-linear and that power consumption in watts improves when driven over the rated 12V. Watts are calculated as the product of the measured Volts * Amps. Because of the current inversion that happens as the controllers come fully on-line, these LEDs can’t be properly controlled near full brightness with a current-controlled power supply, though it works well to provide continuous and fairly linear dimming at low outputs, once the voltage/current function changes slope, the current limiting controller in the power supply freaks out.
Lux v. Volts
This chart shows the lux output by each of the three LEDs as a function of input voltage, revealing the effect of the internal LED driver coming on line and regulating output, which complicates controlling brightness but protects the LEDs. The 5W LEDs have a fairly gentle response slope and start a very low voltage (2V) so are a good choice for a linear power supply. The 4W LEDs don’t begin to light up until just over 6V, and so are a good match for low-cost switch mode supplies that don’t go to zero.
Lux/W v. Volts
This chart shows the luminous efficiency (Lux/Watt, Lumen measurement is quite complicated) by each of the three LEDs as a function of input voltage, showing that overdriving the LEDs past the rated 12V can significantly improve efficiency. There’s some risk it will overheat the controller at some point and result in failure. I’ll update this post if my system starts to fry LEDs, but my guess is that 14V, which cuts the power load by 20% over 12V operation with the 7.5W lamps I selected, will not significantly impact operational lifetime.
Update: This system has been running for 7 years now. In that time two linear power supplies have failed (they were fairly inexpensive models as such things go). The LED modules had a high infant mortality rate: 2-3 failed in the first few months, another one failed just about every 6 months for the first couple of years. I think it has been 4 years since the last one failed. This implies that longevity is primarily a function of build quality, which varies.
Total System Efficiency
The emitter efficiency is relatively objective, but the total system efficiency includes the power supply. I used a Daiwa SS-330W switching power supply I happened to have in stock to drive the system, which cost less than a dimmable transformer and matching controller, and should be significantly higher quality. The Daiwa doesn’t seem to be easily available any more, but something like this would work well for up to 5A total load and something like this would handle as many as 40 7.5W LEDs on a single control, though the minimum 9V output has to be matched to LEDs to get satisfactory dimming. It is important not to oversize the power supply too much as switch mode supplies are only really efficient as you get close to their rated output. An oversized switchmode power supply can be extremely inefficient.
With the Daiwa, driving 13 7.5W LEDs, I measured 8.46A at 11.94V output or 101 Watts to brightly illuminate the entire kitchen, and providing far more light than 400W of total halogen lights. I measured the input into the power supply at 0.940A at 121.3V or 114 Watts. That means the power supply is 88.6% efficient at 12V, which is more or less as expected for a variable output supply.
Increasing the output voltage to 14.63 Volts lowered the output current to 5.35A or 78 Watts without lowering the brightness at the installation; I measured at 168 lux at both 12.0V at 14.6V. The input current at 14.63V dropped to 0.755A or 91.6 Watts, meaning the power supply is slightly less efficient at lower output currents (as is usually the case).
- Overdriving the 12V rated LEDs to 14.63V improves plug efficiency by 20%.
At the low end, the SS-330W’s minimum output is 4.88V, which yields 12 lux at the counter or a 14x dimming ratio to 7% of maximum illumination, a far better range than is reported for standard dimmer/transformer combinations.
Parts
- 7.5W LED modules from JackyLED
- Daiwa power supply (alternate version)
- 16 gauge speaker cable
- MR-16 cable lamp mounts
- Digital light meter
Raw Data:
(MS Excel file, you will need the xongrid plugin to update the data as rendered in the graphs)
Speaker Build
In December of 2002 (really, 2002, 12 years ago (OMG, >20 years ago)), I decided that the crappy former Sony self-amplified speakers with blown amplifiers that I had wired into my stereo as surround speakers really didn’t sound very good as they were, by then, 7 years old and the holes in the plastic housing where the adjustment knobs once protruded were covered by aging gaffers tape.
At least it was stylish black tape.
I saw on ebay a set of “Boston Acoustics” woofers and tweeters back in the time when ebay prices could be surprisingly good. Boston Acoustics was a well-respected company at the time making fairly decent speakers. 36 woofers and 24 tweeters for $131 including shipping. About 100 lbs of drivers. And thus began the execution of a fun little project.
Design Phase: 2003-2011
I didn’t have enough data to design speaker enclosures around them, but about a year later (in 2003), I found this site, which had a process for calculating standard speaker properties with instruments I have (frequency generator, oscilloscope, etc.) I used the weighted diaphragm method.
WOOFER: PN 304-1150001-00 22 JUL 2000
80MM CONE DIA = 8CM
FS  = 58HZ
RE  = 3.04 OHMS
QMS = 1.629
QES = 0.26
QTS = 0.224
CMS = 0.001222
VAS = 4.322 (LITERS) 264 CUBIC INCHES
EBP = 177.8

NOMINAL COIL RESISTANCE @ 385HZ (MID LINEAR BAND) 3.19 OHMS
NOMINAL COIL INDUCTANCE (@ 1KHZ) 0.448 MHENRY
TWEETER: PN 304-050001-00 16 OCT 2000
35MM CONE DIA
FS  = 269HZ
RE  = 3.29 OHMS
QMS = 5.66
QES = 1.838
QTS = 1.387
CMS = 0.0006
VAS = 0.0778 (LITERS)
EBP = 86.7

NOMINAL COIL RESISTANCE @ 930HZ (MID LINEAR BAND) 3.471 OHMS
NOMINAL COIL INDUCTANCE (@ 1KHZ) 0.153 MHENRY
Awesome. I could specify a cross over and begin designing a cabinet. A few years went by…
In January of 2009 I found a good crossover at AllElectronics. It was a half decent match and since it was designed for 8 ohm woofers, I could put two of my 4 ohm drivers in series and get to about the right impedance for better power handling (less risk of clipping at higher volumes and lower distortion as the driver travel is cut in half, split between the two).
https://web.archive.org/web/20120904083243/http://www.allelectronics.com:80/make-a-store/item/XVR-21/2-WAY-CROSSOVER-INFINITY/1.html
CROSS OVER FREQUENCY
3800HZ CROSSOVER
LOW-PASS: 18DB, 8 OHM
HIGH-PASS: 18DB, 4 OHM
Eventually I got around to calculating the enclosure parameters. I’m not sure when I did that, but sometime between 2009 and 2011. I found a site with a nice script for calculating a vented enclosure with dual woofers, just like I wanted and got the following parameters:
TARGET VOLUME 1.78 LITERS = 108 CUBIC INCHES

DRIVER VOLUME (80MM) = 26.25 CUBIC INCHES = 0.43 LITERS
CROSS OVER VOLUME = 2.93 CUBIC INCHES = 0.05 LITERS
SUM = 0.91 LITERS
1" PVC PORT TUBE: OD = 2.68CM, ID = 2.1CM = 3.46 CM^2
PORT LENGTH = 10.48CM = 4.126"


WIDTH = 12.613 = 4.829"
HEIGHT = 20.408 = 7.82"
DEPTH = 7.795 = 3"
In 2011 I got around to designing the enclosure in CAD:
There was no way to fit the crossover inside the enclosure as the drivers have massive, magnetically shielded drivers, so they got mounted on the outside. The speakers were designed for inside mounting (as opposed to flange mounting) so I opted to radius the opening to provide some horn-loading.
I also, over the course of the project, bought some necessary tools to be prepared for eventually doing the work: a nice Hitachi plunge router and a set of cheap router bits to form the radii and hole saws of the right size for the drivers and PVC port tubes.
Build Phase (2014)
This fall, Oct 9 2014, everything was ready and the time was right. The drivers had aged just the appropriate 14 years since manufacture and were in the peak of their flavor.
I started by cutting down some PVC tubes to make the speaker ports and converting some PVC caps into the tweeter enclosure. My first experiment with recycled shelf wood for the tweeter mounting plate failed: the walls got a bit thin and it was clear that decent plywood would make life easier. I used the shelf wood for the rest of the speaker: it was salvaged from my building, which was built in the 1930s and is probably almost 100 years old. The plywood came with the building as well, but was from the woodworker who owned it before me.
I got to use my router after so many years of contemplation to shape the faceplates, fabricated from some fairly nice A-grade plywood I had lying around.
Once I got the boxes glued up, I installed the wiring and soldered the drivers in. The wood parts were glued together with waterproof glue while the tweeters and plastic parts were installed with two component clear epoxy. The low frequency drivers had screw mounting holes, so I used those in case I have to replace them, you know, from cranking the tunage.
I lightly sanded the wood to preserve the salvage wood character (actually no power sander and after 12 years, I wasn’t going to sand my way to clean wood by hand) then treated them with some polyurethane I found left behind by the woodworker that owned the building before I did. So that was at least 18 years old. At least.
I supported the speakers over the edge of the table to align the drivers in the holes from below.
The finished assembly looked more or less like I predicted:
Testing
The speakers sound objectively quite nice, but I was curious about the frequency response. To test them I used the pink noise generator in Audacity to generate 5.1 6 channel pink noise files which I copied over to the HTPC to play back through my amp. This introduces the amp’s frequency response, which is unlikely to be particularly good, and room characteristics, which are certainly not anechoic.
Then I recorded the results per speaker on a 24/96 Tascam DR-2d recorder, which also introduces some frequency response issues, and imported the audio files back into Audacity (and the original pink noise file), plotted the spectrum with 65536 poles, and exported the text files into excel for analysis.
Audacity’s pink noise looks like this:

It’s pretty good – a bit off plan below 10 Hz and the random noise gets a bit wider as the frequency increases, but it is pretty much what it should be.
First, I tested one of my vintage ADS L980 studio monitors. I bought my L980s in high school in about 1984 and have used them ever since. In college I blew a few drivers (you know, cranking tunage) but they were all replaced with OEM drivers at the Tweeter store (New England memories). They haven’t been used very hard since, but the testing process uncovered damage to one of my tweeters, which I fixed before proceeding.
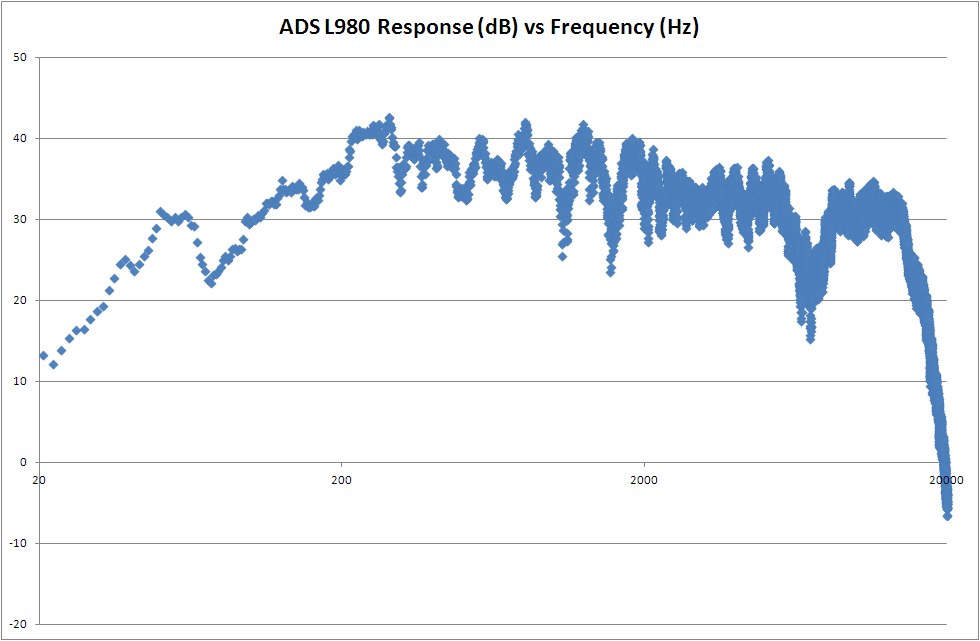
The ADS L980 has very solid response in the low frequency end with a nicely manufactured 12″ woofer and good high end with their fancy woven tweeter. A 3 way speaker, there are inevitably some complexities to the frequency response.
I also tested my Klipsch KSC-C1 Center Channel speaker (purchased in 2002 on ebay for $44.10) to see what that looked like:
It isn’t too bad, but clearly weaker in the low frequency, despite moderate sized dual woofers and with a bit of a spike in the high frequency that maybe is designed in for TV and is perhaps just an artifact of the horn loaded tweeter. It is a two way design and so has a fairly smooth frequency response in the mid-range, which is good for the voice program that a center speaker mostly carries.
And how about those new ones?
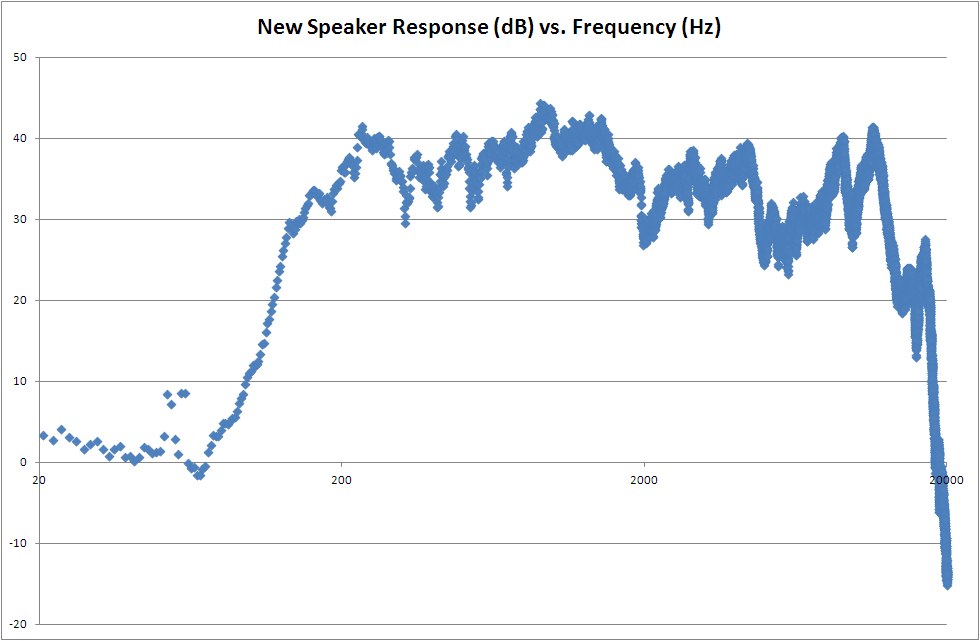
Well… not great, a little more variability than one would hope, and (of course) weak below about 100Hz. I’m a little surprised the tweeters aren’t a little stronger over about 15kHz, though while that might have stood out to me in 1984, it doesn’t now. Overall the response is quite good for relatively inexpensive drivers, the low frequency response, in particular, is far better than I expected given the small drivers. The high frequency is a bit spiky, but quite acceptable sounding.
And they sound far, far better than the poor hacked apart Sony speakers they replaced.
Raw Data
The drawings I fabricated from and the raw data from my tests are in the files linked below:
Lenovo System Update breaks Windows Update
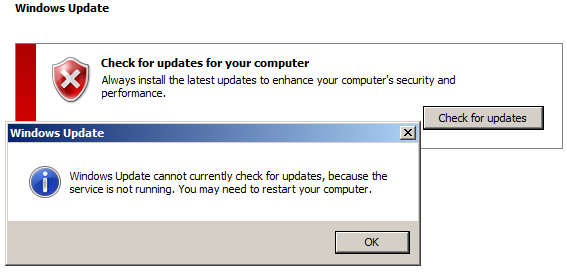
An unfortunate series of events afflicted my poor Lenovo W500. At some point I started to get odd errors and ran sfc /scannow and found a large set of uncorrectable errors in a variety of packages. Nothing caused me too much trouble, so I ignored it. I kept hoping some giant windows update would overwrite all the broken bits and save me the trouble of debugging it, so I was happy when Win 7 Service Pack 1 was finally available – at 70-400MB it has to overwrite just about everything, but my happiness was short lived.
Sadness… somewhere in the preamble updates something got hosed and a check of my disk showed bad blocks. Chkdisk confirmed it and it seemed a failing disk was likely the cause of many of my woes. I strapped as many belts and suspenders around the disk as I could – windows backup, clonezilla, copying files. Clonezilla couldn’t read all the blocks, so I had to use the recover option, but that version still had problems. Dang.
Windows recovery was fail, rollback, in place upgrade, system restore. All fail. Fine. Life sucks – reinstall from scratch and then reinstall all my applications. This is a huge pain in the ass, but windows just get sluggish in a year or so without a complete reinstall anyway; it isn’t like Microsoft cares whether you can get your work done or not, what are you going to do? Pay 100% style premium so The Steve can dictate what you can do? When choosing one evil empire over another, pick the cheapest.
So I do a reinstall from scratch. Windows reinstalls more than a few weeks out from the release of the OS are a monumental undertaking as the updates take forever. Bringing a windows 7 computer up to date takes between 1-1.5GB of updates, after installing a DVD’s worth of software. There’s the endless reboots as patches are installed and removed and whatever, multi-hour downloads. But eventually, you get a perfect, up-to-date OEM blessed configuration. Or so you think… duh duh duh.
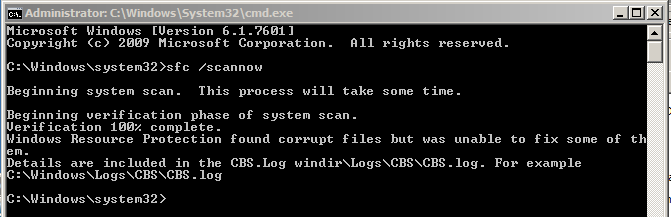
I finished the whole mess, including the Lenovo System Update drivers and windows update stopped working and sfc /scannow gave me errors. Crappenfest. Reverting to the first system snapshot failed, uninstalling every single thing – all windows updates, all Lenovo updates was fail. Whatever did this can’t be fixed after it is done. You’re screwed.
Nothing to do but try again from scratch, this time paying attention and not using the computer at all until everything was installed, including anti-virus. Another 36 hours of updates later, same result. CRAPPENFEST.
How could that be? Some OEM/M$ update is breaking the system, and so began the hunt: reinstall from scratch #3. I used a binary search algo, saving disk images between each iteration so I wouldn’t have to do install from scratch 4. All windows update updates were fine, so the problem was with Lenovo. Updating only essential components was fail, restore windows. Installing just the really important bits one or two at a time (not quite binary splitting the install batch) got me through about half the useful lenovo updates, so time to create an image.
Reviewing the Device Manager, I saw 5 “?” devices – and searching around I found they were related to 3 drivers:
4-in-1 Card reader
Setup from “4in1” folder
- Base system device Ricoh Memory Stick controller
- Base system device Ricoh SD/MMC host controller
- Base system device Ricoh XD- picture card controller
the above 3 unknown devices in device manager will be resolved by the Ricoh cardreader drivers.
Turbo Memory
Some models may or may not have a turbo memory module.
To verify, open “device manager” and check for a unknown device listed as “PCI Memory Controller”.
If such a device is listed, then install the Turbo Memory driver via setup from “turbomem” folder.
You may see a hardware device install popup from systray.
Reboot is required.
AMT
If Intel’s Adaptive Management Technology is implemented in anenterprise enviroment, then the AMT drivers can be installed viasetup from the “AMT\MEI” folder.
If AMT is not employed, AMT can be disabled via Bios.
The drivers from the AMT setup will resolve the unknown devices within “device mananger”, the PCI Simple Communications Controller.
I install just those.
FAIL!
recover using windows system recovery tools (format disk, reinstall from image)
One of those three. AMT I don’t want anyway, so I tried to disable it in BIOS, but there were no entries in my BIOS for AMT so I just disabled it in device manager. ?->! np. I don’t trust it, too deep in the OS. This seems like the problem.
Install Ricoh, seems benign. Reboot, system works. Just Turbo Memory to go.
Turbo Memory is kind of cool, especially for a laptop. As Intel says:
The benefits of Intel Turbo Memory include:
- Faster application load and run time when multi-tasking
- Faster boot time
- Lowers PC power consumption by reducing hard drive spin
It uses some special on the mobo Intel cache memory to speed up disk access like a hybrid SSD/Rotating disk. I want this to work ’cause it cost money to put in the computer. Since it had to be that evil AMT security thing, no problem. FAIL. The problem is Intel’s Turbo Memory driver. If you install it, you’re screwed. Now that I know what the problem is, I find I’m not the only one with it.
I tried both the Lenovo supplied Turbo Memory Driver and the Intel supplied one here . Both are fail. No Turbo Memory For You. There are some hints in forums that maybe Turbo Memory isn’t compatible with advanced format disk drives, so possibly replacing my older 500GB disk with a newer 700GB uncovered a latent incompatibility.
Given how much of a disaster installing it is–the only recovery method is to restore a previous disk image–I suppose that’s one feature of my MoBo that is obsolete now. Bummer. Ate just about a week of work time to find this little monster of a driver. Thanks WinTel.
(my sfc /scannow log was filled with entries like:
POQ 119 starts: 0: Move File: Source = [l:192{96}]"\SystemRoot\WinSxS\Temp\PendingRenames\a52557019366cc01d63500006c0a3c08._0000000000000000.cdf-ms", Destination = [l:104{52}]"\SystemRoot\WinSxS\FileMaps\_0000000000000000.cdf-ms" 1: Move File: Source = [l:162{81}]"\SystemRoot\WinSxS\Temp\PendingRenames58759019366cc01d73500006c0a3c08.$$.cdf-ms", Destination = [l:74{37}]"\SystemRoot\WinSxS\FileMaps\$$.cdf-ms" 2: Move File: Source = [l:224{112}]"\SystemRoot\WinSxS\Temp\PendingRenames58759019366cc01d83500006c0a3c08.$$_microsoft.net_3296b36dbe4c7fa3.cdf-ms", Destination = [l:136{68}]"\SystemRoot\WinSxS\FileMaps\$$_microsoft.net_3296b36dbe4c7fa3.cdf-ms" 3: Move File: Source = [l:244{122}]"\SystemRoot\WinSxS\Temp\PendingRenames\c6495e019366cc01d93500006c0a3c08.$$_microsoft.net_framework_83386eac0379231b.cdf-ms", Destination = [l:156{78}]"\SystemRoot\WinSxS\FileMaps\$$_microsoft.net_framework_83386eac0379231b.cdf-ms" 4: Move File: Source = [l:266{133}]"\SystemRoot\WinSxS\Temp\PendingRenames\26ab60019366cc01da3500006c0a3c08.$$_microsoft.net_framework_v2.0.50727_e9368840261e60ee.cdf-ms", Destination = [l:178{89}]"\SystemRoot\WinSxS\FileMaps\$$_microsoft.net_framework_v2.0.50727_e9368840261e60ee.cdf-ms" 5: Move File: Source = [l:288{144}]"\SystemRoot\WinSxS\Temp\PendingRenames\860c63019366cc01db3500006c0a3c08.$$_microsoft.net_framework_v2.0.50727_redistlist_2e6ab8b35e9ef953.cdf-ms", Destination = [l:200{100}]"\SystemRoot\WinSxS\FileMaps\$$_microsoft.net_framework_v2.0.50727_redistlist_2e6ab8b35e9ef953.cdf-ms"
POQ 119 ends.
IBM BoMC on the Fritz
I was updating the firmware of our servers with IBM’s Bootable Media Creator – it is usually a great tool: it builds a bootable linux disk with all the latest firmware patches for your system – or all IBM systems if you want with a small utility that fetches all the latest updates for you and assembles them into an .iso.

The current version is ibm_utl_bomc_2.10_windows_i386.exe, but when you run it, it fails when it gets to uncompressing ibm_utl_boot_tools-130_anyos_x86-64-mid.zip (probably ibm_utl_boot_tools-130_anyos_x86-64-full.zip too, if you need that for your system instead). I finally noticed v130 was only 4mb and my old V110 was 65MB.
The util only downloads about 500k of each binary patch each time it is run. Fortunately, the efforts are cumulative. Unfortunately any driver bigger than about 1MB is effected and will not download completely the first time. Or the first 2x(size in mb) times. If you run ibm_utl_bomc_2.10_windows_i386.exe -m 8863 -l C:\temp from the command line (as an example, assuming your machine type is 8863) TWICE and the second time you don’t see something like:
(1 of 8) Acquiring ibm_fw_diag_zuyt38a_linux_i386...

Already downloaded.
for any driver, then it isn’t fully downloaded. Keep repeating. I wrote a script to automate the process and put about 100 repetitions of the command in the batch and went out to dinner. When I got back, all the drivers were reporting “already downloaded.”
@echo off

SET LOOP=0

ibm_utl_bomc_2.10_windows_i386.exe -m 8863 -l C:\temp

[copy and paste this or use a do loop to repeat 100x]

:END
How to Disable Stupid Extra Mouse Buttons
Modern mice seem to think it essential to include a “bump this side of the mouse to delete your work” button, oddly configured as a “back” button in most browsers. Why? I have no idea. Personally I rarely actually need to navigate forward and backward while browsing. I suppose a lot of people have navigation remorse or something, but for me the button has only been a source of frustration.
There seemed to be only one option since the logitech mouse driver suite is inexplicably larger than most complete operating system installs and therefore unsuitable for any normal computer, taking apart the mouse and cutting the leads to the Stupid Switches.
Instead I found this little utility that lets you disable the buttons (you can also map them to something else you’d like to accidentally trigger if that amuses you). Now I won’t lose my work when creating a message in Gmail or working in redmine.

BMW 325 e36 Comfort Relay Fix
Our BMW’s windows started to get flaky. They wouldn’t move for a few minutes after the car started, but eventually worked normally, an annoying intermittent problem that wasn’t worth a trip to the repair shop in the hope they wouldn’t work for the mechanic.
I checked the fuse under the hood (#33, 10A) and poked the baby-head-crush safety breaker a few times to no avail.
Then, last night, the windows stopped moving all together. Testing as advised, neither did the sunroof. I found this link and decided it was probably my comfort relay too. This page had a nice list of resources, but the best is gone and only partially available on the internet archive so here’s what I did (and, not to spoil the suspense, this worked).
The panels you need to remove are under the steering wheel. You’re looking at them if you’re lying on your back in the driver’s side foot well, looking up at the bottom of the dashboard. You will need to get through two layers of material to remove the relay, the plastic cover and an aluminum crush panel that protects your knees in a crash. You will need the following tools:
- #2 Philips screwdriver
- Small (1/4″ or so) flat screw driver
- 10mm socket
- Socket extension
- Socket wrench
- Soldering iron
- Solder
First remove the plastic panel
Step 1 – remove the plastic cover that hides an unsightly screw head with the flat screw driver. You just pry it off.

Step 2 – Remove the now-exposed screw, one of three holding the plastic panel in place.

Step 3 – Remove screw two of three.

Step 4 – Remove Screw three of three. The panel should now sort of flop a bit, but it is still retained by a tight fit and two clips between the dash and the driver’s door.

Step 5 – Pull the plastic panel straight aft, releasing the clips shown and remove it. There is a speaker attached to the plastic panel attached by some wires. If the speaker doesn’t pop out of it’s own accord, you can either pull it out or release the wires.

Step 6 – Remove the knee panel with the 10mm socket. The heads are recessed so you will either need a long socket or an extension to reach them. There are three bolts holding the panel in. As it is removed, lower it gently, there is a metal bracket clamped between the panel and the dash structure that will be loose now.

Step 7 – A previous mechanic had solved the assembly problem of the loose mechanical bracket with some electrical tape. This seemed to work well and made reassembly easy.

Step 8 – Remove the blue comfort relay. This is a bit tedious as I did not remove the bracket first – rather wiggled it out of it’s mount. There are two retaining clips that I depressed that may have aided removal (or not). The relay is pulled “up” – away from the ground and up into the tangle of the dash. This is probably the most tedious step, it is all easy from here.

Step 9 – The comfort relay removed. You can replace it or fix it. If you fix it, pry open the case with your flat screw driver by popping the clips on either side and sliding the blue cover off.

Step 10 – Identify the bad joint. Like other people have found, mine was cracked all the way around.

Step 11 – Solder the joint back together. I was generous with the solder so it might last another 200,000 miles.

Step 12 – After putting the relay back, reinstalling the knee panel, and mostly replacing the plastic panel, snap the speaker back into the back-side (inside) of the plastic panel then replace the screws and cover the unsightly head of the visible one with the plastic bit.

Windows go up. Windows go down.
Rental Towncar
Alas, nobody to chauffeur around. But nothing like driving around in a giant land barge to make you think about global warming: ‘scuse my effluents!
Kind of a comfy car in a rolling barcalounger way. Room for 6. The power open and close trunk firmly inserts “lazy” between “quintessential” and “american”
It is quiet and the stereo is pretty good. The dash is a giant slab of plastic, but this isn’t really a driver’s car.
The engine is surprisingly effective given the mass of the vehicle and the queasy squishy suspension.

Yellow Fiat Panda

We had some amusing rental cars in Italy. First and last a Ford Focus that was quite competent, had enough room, and handled quite well. Then we went to Portugal and rented a car to drive to Spain. Perhaps because Spain and Portugal still have some hard feelings, it is absurdly expensive to rent a car in one country and return it in the neighboring company. It would cost less to pay someone to push the car back.
So we were given a “Spanish car” in Lisbon, a Toyota Yaris with a really pronounced fuel delivery problem at anything above 1/2 throttle which had the car juddering and barely making it up hills. Hertz sent out the mechanic who asked if we had the AC on (yes, it was 40 out) and then said it was normal. I told him it felt like it was running on 3 cylinders and he said that was right, it had 3 cylinders. Now we’ve rented a couple of Yarii before, and they make it up the mountain in Italy fine with the AC on, and would easily have climbed the hills of Lisbon, but they wouldn’t take it back and besides even if they wanted to there simply wasn’t another car available in Iberia. So we got a reservation from EuropeCar and called Hertz and were told we could drop the sick Yaris off at LIS.
But when we got there, that wasn’t the case – apparently Hertz Spain would charge Hertz Portugal €25,000 if they accepted it. As we made it clear we wouldn’t be driving it away, there was suddenly another Spanish car at the Hertz downtown office.
We drove downtown where they were super nice and promptly produced another of the same competent Ford’s we had in Italy with one minor variation – the driver’s side mirror had been destroyed by the car wash just before we got there. So they gave us a nice Portuguese Renault Laguna III with the key card ignition system. It worked great and was a fine car to drive with a useful 6 speed manual transmission.
It got us to SVQ without any problems and we could even keep up with our friends in their Mercedes C230 with the strange transmission that switched into “limp home mode” immediately. Yes, the car rental adventure was not ours alone, their car, a high end rental Mercedes was flawed as well. They asked “why does the car redline at 150? Is that bad?” It took a little work to be sure there wasn’t a button or feature being missed (like some manual shift override), but no… it was a “feature” not a bug, and was to remind the driver to get to a service station before the transmission fell out of the car. It made it to Spain and back in 2nd.
When we got back to BLQ our Focus was touring around Florence, so we picked up the cheerful Yellow Fiat Panda. Pandas are great little (little) cars. They handle surprisingly well, have surprising pickup and, like the tardis, are bigger inside than outside. Even so, a panda can’t really hold more than two people and their normal travel luggage, and three is a tight squeeze even if one is only 80% full size. But we all packed in and zipped back home suddenly noticing that the yellow panda must be the year’s most popular car.
Finally we returned the Panda, got our Focus, and drove to Rome with three adults, one awfully tall 12 year old, and a lot of luggage in relative comfort and in good time.
Ford Mustang
Rental car review: Ford Mustang
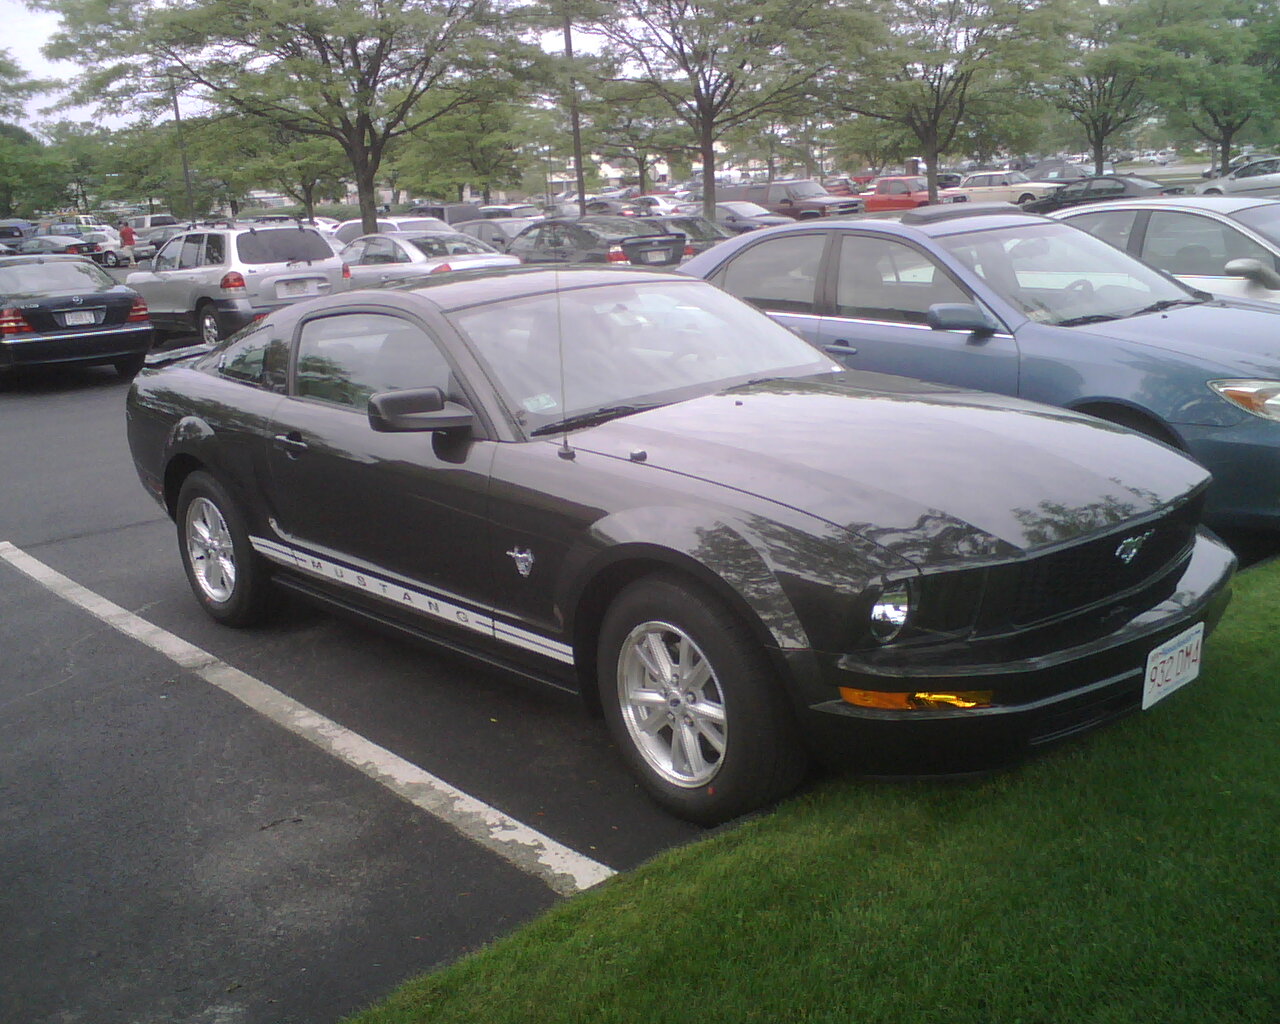
I got this car with plastic on the steering wheel, the back seat belts buckled, and 5 miles on the odometer. I very much enjoy mustangs: they’re fast and throaty and fun to drive and equipped with loud and amusing stereos.
They are small in the trunk and the back seats are pretty useless – definitely not where you want to stuff an large, elderly coworker. But the car is fun. Fast and fun.
The engine has more show than go – the sound of the engine is one of big power and extreme performance. While the car handles much better than most rental cars, it does not live up to the sound of the exhaust. A nice Audi or Volvo, for example, will accelerate faster, harder, and longer and take turns better, but never call attention to themselves while doing it.
On the other hand, actually going really fast is not always relevant: having fun is more to the point and the mustang is fun. It feels spry and agile and powerful and serves well to take years off the driver’s age. It’s the prefect car to cruise suburban malls, especially if one dye’s one’s hair or wears a toupee. If chicks aren’t the goal, then it certainly makes getting to work an exercise in regression therapy.
Aside from the throaty roar and sporty performance, road noise is poorly isolated but well compensated for by a loud, bass-heavy stereo typically equipped with a CD-MP3 changer that can hold 6 CDs (or maybe 60 albums) which means on older cars one can often find heavy metal compilations forgotten in the changer. Not so much classical.
- Quiet – Not very quiet.
- Comfortable – fairly comfortable.
- Engine – a great engine for a rental car, a lot of fun.
- Suspension – very good for a rental car.
- Basic amenities – everything that could be reasonably powered is.
- Stereo – killer stereo: loud and plays MP3s off a 6 CD changer.
- Security – small but secure trunk.
Rental car review Buick Allure

The Buick Allure is similar to the Toyota Avalon in form and function, but isn’t quite up to the task. The Buick is a nominally acceptable American car, but Buick dashboards are (and always have been) these strange, broad flat things that don’t really appeal to me. The car is a reasonable four door sedan, neither particularly bad at anything nor particularly good.
- Quiet – generally quiet, but got a bit noisy on the 401. The AC system is a bit too zealous – it’s hard to just get a vent function on a nice day and the windows open are noisy.
- Comfortable – fairly comfortable.
- Engine – a moderate engine, responsive but not astonishingly so.
- Suspension – it works well enough but isn’t super agile.
- Basic amenities – everything that could be reasonably powered is.
- Stereo – it was good enough but the high frequency speakers point straight to the center and so it sound unbalanced (the driver’s side tweeter pointing at the passenger and being inaudible to the driver).
- Security – the trunk is large and secure.