Linux
Posts about the Linux operating system.
Deep Learning Image Compression: nearly 10,000:1 compression ratio!
Here disclosed is a novel compression technique I call Deep Learning Semantic Vector Quantization (DLSVC) that achieves in this sample 9,039:1 compression! Compare this to JPEG at about 10:1 or even HEIC at about 20:1, and the absolutely incredible power of DL image compression becomes apparent.
Before I disclose the technique to achieve this absolutely stunning result, we need to understand a bit about the psychovisual mechanisms that are being exploited. A good starting point is thinking about:
It was a dark and stormy night and all through the house not a creature was stirring, not even a mouse.
I’m sure each person reading this develops an internal model, likely some combination of a snug, warm indoor Christmas scene while outside a storm raged, or something to that effect derived from the shared cultural semantic representation: a scene with a great deal of detail and complexity, despite the very short text string. The underlying mechanism is a sort of vector quantization where the text represents a series of vectors that semantically reference complex culturally shared elements that form a type of codebook.
If a person skilled at drawing were to attempt to represent this coded reference visually, it is likely the result would be recognizable to others as a representation of the text; that is, the text is an extremely compact symbolic representation of an image.
So now lets try a little AI assisted vector quantization of images. We can start with the a generic image from Wikipedia:
Next we use AI to reduce the image to a symbolic semantic representation. There are far more powerful AI systems available, but we’ll use one that allows normal people to play with it, @milhidaka’s caption generator on github:
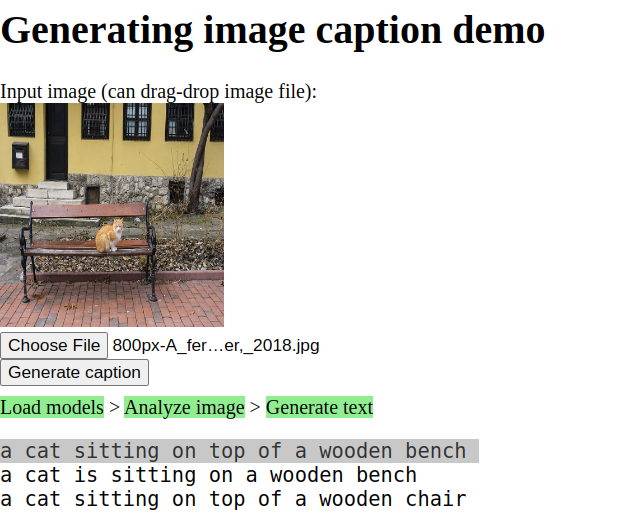
This is a cat sitting on top of a wooden bench which we can LZW compress assuming 26 character text to a mere 174 bits or 804D22134C834638D4CE3CE14058E38310D071087. That’s a pretty compact representation of an image! The model has been trained to understand a correlation between widely shared semantic symbols and elements of images and can reduce an image to a human-comprehensible, compact textual representation, effectively a lossy coding scheme referencing a massive shared codebook with complex grammatical rules that further increase the information density of the text.
Decoding those 174 bits back to the original text, we can feed them into an image generating generative AI model, like DALL·E mini and we get our original image back by reversing the process leveraging a different semantic model, but one also trained to the same human language.
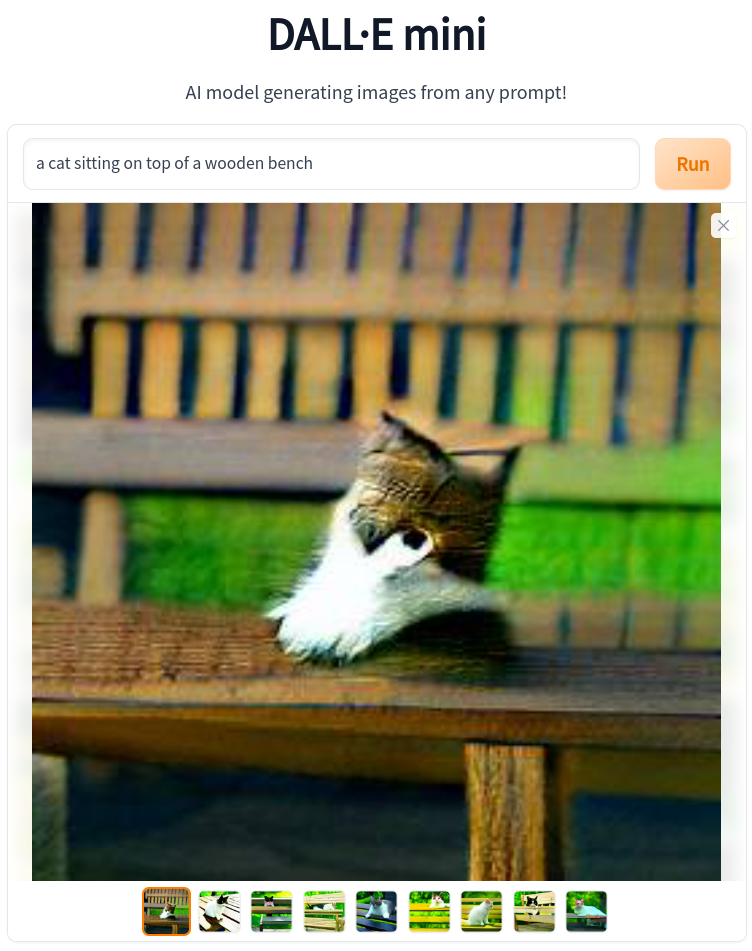
It is clearly a lossy conversion, but here’s the thing: so too is human memory lossy. If you saw the original scene and 20 years later, someone said, “hey, remember that time we saw the cat sitting on a wooden bench in Varna, look, here’s a picture of it!” and showed you this picture, I mean aside from the funny looking cat like blob, you’d say “oh, yeah, cool, that was a cute cat.”
Using the DALL·E mini output as the basis for computing compression rather than the input image which could be arbitrarily large, we have 256×256×8×3 bits output = 1,572,864 bits to represent the output image raw.
WebP “low quality” compressing the 256×256 image yields a file of 146,080 bits or 10.77:1 compression.
My technique yields a compressed representation of 174 bits or 9,039:1 compression. DALL·E 2‘s 1024×1024 output size should yield 144,624:1 compression.
This is not a photograph. This is Dall-E 2’s 25,165,824 bit (raw) interpretation of the 174 bit text “a cat sitting on top of a wooden bench” which was derived by a different AI from the original image.
So just for comparison, lets consider how much we can compress the original image, resizing to 32×21 pixels and, say, webp, to 580 bytes.
 Even being generous and using the original file’s 7,111,400 bytes such that this blancmange of an image represents 12,261:1 compression, it is still 12× worse compression than our novel technique, it is hard to argue that this is a better representation of the original image than our AI-based semantic codebook compression achieved.
Pied Piper got nothin’ on this!
Audio Compression for Speech
Speech is generally a special class of audio files where compression quality is rated more on intelligibility than on fidelity, though the two related the former may be optimized at the expense of the latter to achieve very low data rates. A few codecs have emerged as particularly adept at this specific class: Speex, Opus, and the latest, Google’s Lyra, a deep learning enhanced codec.
Lyra is focused on Android and requires a bunch of Java cruft to build and needs debugging. It didn’t seem worth the effort, but I appreciate the Deep Learning based compression, it is clearly the most efficient compression possible.
I couldn’t find a quick whatcha-need-to-know is kind of summary of the codecs, so maybe this is useful:
Opus
On Ubuntu (and most Linux distros) you can install the Opus codec and supporting tools with a simple
# sudo apt install opus-tools
If you have ffmpeg installed, it provides a framework for dealing with IO and driving libopus from the command line like:
# ffmpeg -i infile.mp3 -codec:a libopus -b:a 8k -cutoff 8000 outfile.opus
Aside from infile.(format) and outfile.opus, there are two command line options that make sense to mess with to get good results: the bitrate -b:a (bit rate) and the -cutoff (frequency), which must be 4000 (narrowband), 6000 (mediumband), 8000 (wideband), 12000 (super wideband), or 20000 (fullband). The two parameters work together and for speech limiting bandwidth saves bits for speech.
There are various research papers on the significance of frequency components in speech intelligibility that range from about 4kHz to about 8kHz (and “sometimes higher”). I’d argue useful cutoffs are 6000 and 8000 for most applications. The fewer frequency components fed into the encoder, the more bps remain to encode the residual. There will be an optimum value which will maximize the subjective measure of intelligibility times the objective metric of average bit rate that has to be determined empirically for recording quality, speaker’s voice, and transmission requirements.
In my tests, my sample, the voice I had to work with an 8kHz bandwidth made little perceptible difference to the quality of speech. 6kbps VBR (-b:a 6k) compromised intelligibility, 8k did not, and 24k was not perceptibly compromised from the source.
one last option to consider might be the -application, which yields subtle differences in encoding results. The choices are voip which optimizes for speech, audio (default) which optimizes for fidelity, and lowdelay which minimizes latency for interactive applications.
# ffmpeg -i infile.mp3 -codec:a libopus -b:a 8k -application voip -cutoff 8000 outfile.opus
VLC player can play .opus files.
Speex
AFAIK, Speex isn’t callable by ffmpeg yet, but the speex installer has a tool speexenc that does the job.
# sudo apt install speex
Speexenc only eats raw and .wav files, the latter somewhat more easily managed. To convert an arbitrary input to wav, ffmpeg is your friend:
# ffmpeg -i infile.mp3 -f wav -bitexact -acodec pcm_s16le -ar 8000 -ac 1 wavfile.wav
Note the -ar 8000 option. This sets the sample rate to 8000 – Speexenc will yield unexpected output data rates unless sample rates are 8000, 16000, or 32000, and these should correlate to the speexenc bandwidth options that will be used in the compression step (speexenc doesn’t transcode to match): -n “narroband,” -w “wideband,” and -u “ultrawideband”
# speexenc -n --quality 3 --vbr --comp 10 wavfile.wav outfile.spx
This sets the bandwidth to “narrow” (matching the 8k input sample rate), the quality to 3 (see table for data rates), enables VBR (not enabled by default with speex, but it is with Opus), and the “complexity” to 10 (speex defaults to 3 for faster encode, Opus defaults to 10), thus giving a pretty head-to-head comparison with the default Opus settings.
VLC can also play speex .spx files. yay VLC.
Results
The result is an 8kbps stream which is to my ear more intelligible than Opus at 8kbps – not 😮 better, but 😐 better. This is atypical, I expected Opus to be obviously better and it wasn’t for this sample. I didn’t carefully evaluate the -application voip option, which would likely tip the tables results. Clearly YMMV so experiment.
Save your email! Avoid the Thunderbird 78 update
History repeats itself as the TB devs learn nothing from the misery they created by auto-updating 60x users to 68 without providing any warning or option to avoid the update. This is crappy user management. On updates that will break an installed add-on, the user should be informed of what will be disable and asked if they want to proceed with the update, not silently forced to conform to a stripped-down, unproductive environment as if the user’s efforts at optimization were childish mistakes unworthy of consideration or notice.
The Thunderbird devs have increasingly adopted a “if you’re not doing it our way, you’re doing it wrong and we’re going fix your mistake whether you like it or not” attitude. This is highly annoying because the org already alienated their add-on community by repeatedly breaking the interface models add-on developers relied on.
For a while add-on devs gamely played along dealing with reputational damage as idiotic and poorly planned actions by Thunderbird devs broke their code and left them to deal with user frustration and scrambled to fix problems they didn’t create. Many, if not by now most, add-on developers finally had enough and abandoned ship. This is tragic because without some of the critical modifications to Thunderbird provided by developers it is essentially unusable.
I eventually came to peace with the add-on-pocolypse between 60 and 68 as add on developers worked through it and very carefully set my TB 68 to not update ever again, even though 90a finally fixes the problem that 68 caused where it became impossible to display dates in ISO 8601 format, but that’s a whole ‘nother kettle of fish.
Still, despite trying to block it, I got a surprise update; if this keeps up, I’ll switch to Interlink Mail and News.
So if you, like I did, got force “upgraded” to 78 from a nicely customized 68, this is what worked for me to undo the damage: (If you weren’t surprise updated, then jump right down to preventing future surprises.)
- Uninstall thunderbird (something like # sudo apt remove thunderbird)
- Download the last 68:
- Extract the tar file and copy it (sudo) to /usr/lib/thunderbird
sudo mv ~/downloads/thunderbird/ /usr/lib/thunderbird
- Create a desktop entry
# nano ~/.local/share/applications/tb68.desktop

[Desktop Entry]
Version=1.0
Type=Application
Name=Thunderbird-68
Icon=thunderbird
Exec="/usr/lib/thunderbird/thunderbird"
Comment=last TB version
Categories=Application;Network;Email;
Terminal=false
MimeType=x-scheme-handler/mailto;application/x-xpinstall;
StartupNotify=true
Actions=Compose;Contacts
- Prevent future updates (hopefully) by creating a no-update policy file:
# sudo nano /usr/lib/thunderbird/distribution/policies.json

{
  "policies": {
      "DisableAppUpdate": true
  }
}
and then, just to be sure, break the update checker code:
# sudo mv /usr/lib/thunderbird/updater /usr/lib/thunderbird/no-updater
# sudo mv /usr/lib/thunderbird/updater.ini /usr/lib/thunderbird/no-updater.ini
- Start the freshly improved and downgraded to the last remotely usable version of Thunderbird with a special downgrade allowed option the first time from the command line:
# /usr/lib/thunderbird/thunderbird --allow-downgrade
If you were unlucky enough to launch TB 78 even once, your add-ons are screwed up now (thanks devs, Merry Christmas to you too). Those that have a 78 compatible version will have been auto-updated to the 78 version which isn’t compatible with 68 (w00t w00t, you can see why the plugin devs quit in droves). At least this time your incompatible add-ons weren’t auto-deleted like with 68. Screen shot or otherwise capture a list of your disabled plugins, then remove the incompatible ones and add them back to the 68-compatible previous release.
If the “find plugins” step doesn’t find your 68 plugin (weird, but it happens) then google it and download the xpi and manually add it.
- Restart one more time normally to re-enable the 68 compatible add-ons without 78 updates that the 78 launch disabled.
One more detail – if find your CardBook remote address books are gone, you need to rebuild your preferences.
- Find your preferences folder: help->Troubleshooting Information-> about:profiles -> Open Directory
- Back up your profile (good thing to do no matter what)
- Uninstall the CardBook plugin
- Quit TB
- In your profiles directory, delete all files that end with .sqlite (
rm *.sqlite) - Restart TB (the .sqlite files should be recreated)
- Reinstall the CardBook plugin. Your address books should reappear. (if not, the advice on the interwebs is to create a new profile and start over).
PHEW! just a few hours of lost time and you’ve fixed the misery the TB devs forced on you without asking. How nice. What thoughtful people.
[poll id=”2″]
Compile and install Digikam 8.1 on Ubuntu 22.04 (Jammy Jellyfish)
Digikam is an incredibly powerful media management tool that integrates a great collection of powerful media processing projects into a single, fairly nice and moderately intuitive user interface. The problem is that it make use of SO many projects and libraries that installation is quite fragile and most distributions are many years out of date – that is a typical sudo apt install digikam will yield version 4.5 while release is (as of this writing) 8.1.

In particular, this newer version has face detection that runs LOCALLY – not on Google or Facebook’s servers – meaning you don’t have to trade your personal photos and all the data implicit in them to a data broker to make use of such a useful tool. Sure, Google once bought and then improved Picasa Desktop which gave you this function, but then they realized this was cutting into their data harvesting business and discontinued Picasa and tried to convince people to let them look at all their pictures with Google Photos, which is massively creepy. We really, really need to make personal data a toxic asset, such an intolerable liability that any company that holds any personal data has negative value. But until then, use FOSS software on your own hardware where ever possible.
You can compile the latest version on Ubuntu 22.04 (Jammy Jellyfish), though not exactly painlessly, or you can install the flatpak appimage easily. I hate flatpaks with a passion (appimage is much better, it is self-contained, though still breaks the integration value of having a program installed on your computer just because library maintenance is tedious and devs can’t be bothered), so I went through the exercise and found what appears to be stable success with the following procedure which yielded a fully featured digikam with zero dependency errors or warnings and all features enabled using MariaDB as a backend.
Updating Ubuntu from 20.04 to 21.10 (or any other major update too) will (as typical) break a ton of stuff. For “reasons” the updater uninstalls all sorts of things like MariaDB and many of the dependencies. Generally, as libraries change versions, recompiling is required. This is so easy with FreeBSD ports…
Install and configure MariaDB
sudo apt update
sudo apt install mariadb-server
sudo mysql_secure_installation
The secure options are all good, accept them unless you know better.
Start the server (if it isn’t)
sudo systemctl start mariadb.service
sudo systemctl enable mariadb --now
sudo systemctl status mariadb.service
Do some really basic config:
sudo nano /etc/mysql/mariadb.conf.d/50-server.cnf
and set:
character-set-server = utf8mb4
collation-server = utf8mb4_general_ci
default_storage_engine = InnoDB
Switch to mariadb and create an admin user account and (I’d suggest) one for digikam as below. It seems this has to be done before the first connect and can’t be fixed after. You’ll probably want to use a different ‘user’ than I did, but feel free.
sudo mariadb
CREATE USER 'gessel'@'localhost' IDENTIFIED BY 'password';
GRANT ALL ON *.* TO 'gessel'@'localhost' IDENTIFIED BY 'password';
CREATE DATABASE digikam;
GRANT ALL PRIVILEGES ON digikam.* TO 'gessel'@'localhost';
FLUSH PRIVILEGES;
should correctly create the correct user – though check the instructions tab on the database connection options pane for any changes if you’re following these instructions for install of a later version. You will need the socket location to connect to the database so before exit; run:
mysqladmin -u admin -p version
Should yield something like:
Enter password:
mysqladmin  Ver 9.1 Distrib 10.3.25-MariaDB, for debian-linux-gnu on x86_64
Copyright (c) 2000, 2018, Oracle, MariaDB Corporation Ab and others.

Server version		10.3.25-MariaDB-0ubuntu0.20.04.1
Protocol version	10
Connection		Localhost via UNIX socket
UNIX socket		/var/run/mysqld/mysqld.sock
Uptime:			5 hours 26 min 6 sec

Threads: 29  Questions: 6322899  Slow queries: 0  Opens: 108  Flush tables: 1  Open tables: 74  Queries per second avg: 323.157
And note the value for UNIX socket, you’re going to need that later: /var/run/mysqld/mysqld.sock – yours might vary.
Install digiKam Dependencies
Updates 2021-10-30 🎃
- Updated to libx264-163 and libx265-199
- Added libopencv-dev dependency
- Version change from 7.2.0 to 7.3.0
Updates 2022-02-01 🧧
- Installing on Ubuntu 21.10 “impish”
- Version change to 7.5.0 (note camelcase used for file name now, “
digiKam” not “digikam“) - Problem with
libopencv-devrequired selecting a #sudo aptitude installsolution to get past alibilmbase-dev but it is not installableerror.
Updates 2023-09-29 🥮
- Installing on Ubuntu Ubuntu 22.04 “Jammy Jellyfish”
- Version change to 8.1.0 (note camelcase used for file name now, “digiKam” not “digikam”)
- libjasper4 → libjasper7
- version 8 migrated to QT6
- libx264-163 → libx264-164
- Qt x11 extras removed with QT6
- libqt5xmlpatterns5-dev replaced with Rajce plugin
- Marble (geolocation) won’t work with QT6 quite yet (as of writing). A patch was pushed 2023-09-24 but hasn’t hit repros.
Digikam has just a few dependencies.… just a few... the below command should install the needed for 7.30 on Ubuntu 21.10. Any other version combination might be different. Things are a bit screwy between QT5 and QT6, apologies if this is mixed up:
sudo aptitude install \
bison \
checkinstall \
devscripts \
doxygen \
extra-cmake-modules \
ffmpeg \
ffmpegthumbnailer \
flex \
graphviz \
help2man \
jasper \
libavcodec-dev \
libavdevice-dev \
libavfilter-dev \
libavformat-dev \
libavutil-dev \
libboost-dev \
libboost-graph-dev \
libeigen3-dev \
libexiv2-dev \
libgphoto2-dev \
libjasper-dev \
libjasper-runtime \
libjasper7 \
libjpeg-dev \
libkf5akonadicontact-dev \
libkf5calendarcore-dev \
libkf5contacts-dev \
libkf5doctools-dev \
libkf5filemetadata-dev \
libkf5kipi-dev \
libkf5notifications-dev \
libkf5notifyconfig-dev \
libkf5sane-dev \
libkf5solid-dev \
libkf5threadweaver-dev \
libkf5xmlgui-dev \
liblcms2-dev \
liblensfun-dev \
liblqr-1-0-dev \
libmagick++-6.q16-dev \
libmagick++-6.q16hdri-dev \
libmagickcore-dev \
libmarble-dev \
libqt5networkauth5-dev \
libqt5xmlpatterns5-dev \
libqt6core5compat6-dev \
libqt6opengl6-dev \
libqt6openglwidgets6 \
libqt6sql6-mysql \
libqt6svg6-dev \
libqt6networkauth6-dev \
qt6-webengine-dev \
libqt6webview6 \
qt6-webview-dev \
libqtav-dev \
libqtwebkit-dev \
libswscale-dev \
libtiff-dev \
libusb-1.0-0-dev \
libx264-164 \
libx264-dev \
libx265-199 \
libx265-dev \
libxml2-dev \
libxslt1-dev \
marble \
pkg-kde-tools \
qt6-base-dev \
qt6-base-dev-tools \
qt6-multimedia-dev \
qt6-webengine-dev \
libopencv-dev \
qt6-webengine-dev-tools
Compile Digikam
Switch to your projects directory (~/projects, say) and get the source, cross your fingers, and go to town. The make -j4 command will take a while to compile everything. There are two basic mechanisms for getting the source code: wget the taball or git pull the repository.
Download the tarball
Check the latest version at https://download.kde.org/stable/digikam/ It was 7.3.0, but is now 8.1.0 and will, certainly change again. This is currently a 255.3 MB download (!). Note the csclub mirror below has 8.0.0.
wget https://mirror.csclub.uwaterloo.ca/kde/Attic/digikam/8.0.0/digiKam-8.0.0.tar.xz
tar -xvf digiKam-8.0.0.tar.xz
cd digiKam-0.0.0.tar.xz
git pull the repository
Git uses branches/tags so check the pull down list of latest branches and tags at the top left, below the many, many branches is the tag list at https://invent.kde.org/graphics/digikam/-/tree/v8.1.0 , latest on top, and currently 8.1.0. This is currently a 1.4 GB git pull (!!).
There was an issue in the v7.3.0 tag that caused built to fail that was fixed in current, so building “stable” isn’t always the best choice for stability.
git clone -b v8.1.0 https://invent.kde.org/graphics/digikam
cd digikam
Then follow the same steps:
./bootstrap.linux
cd build
make -j4
sudo su
make install/fast
Compiling might take 15-30 minutes depending on CPU. Adjust -jx to optimize build times, the normal rule of thumb is that x=# of cores or cores+1, YMMV, 4 is a reasonable number if you aren’t confident or interested in experimenting.
The ./bootstrap.linux result should be as below; if it indicates a something is missing then double check dependencies. If you’ve never compiled anything before, you might need to install cmake and and some other basics not in the apt install list above:
-- ----------------------------------------------------------------------------------
--  digiKam 7.2.0 dependencies results   <https://www.digikam.org>
--
--  MySQL Database Support will be compiled.. YES (optional)
--  MySQL Internal Support will be compiled.. YES (optional)
--  DBUS Support will be compiled............ YES (optional)
--  App. Style Support will be compiled...... YES (optional)
--  QWebEngine Support will be compiled...... YES (optional)
--  libboostgraph found...................... YES
--  libexiv2 found........................... YES
--  libexpat found........................... YES
--  libjpeg found............................ YES
--  libkde found............................. YES
--  liblcms found............................ YES
--  libopencv found.......................... YES
--  libpng found............................. YES
--  libpthread found......................... YES
--  libqt found.............................. YES
--  libtiff found............................ YES
--  bison found.............................. YES (optional)
--  doxygen found............................ YES (optional)
--  ccache found............................. YES (optional)
--  flex found............................... YES (optional)
--  libakonadicontact found.................. YES (optional)
--  libmagick++ found........................ YES (optional)
--  libeigen3 found.......................... YES (optional)
--  libgphoto2 found......................... YES (optional)
--  libjasper found.......................... YES (optional)
--  libkcalendarcore found................... YES (optional)
--  libkfilemetadata found................... YES (optional)
--  libkiconthemes found..................... YES (optional)
--  libkio found............................. YES (optional)
--  libknotifications found.................. YES (optional)
--  libknotifyconfig found................... YES (optional)
--  libksane found........................... YES (optional)
--  liblensfun found......................... YES (optional)
--  liblqr-1 found........................... YES (optional)
--  libmarble found.......................... YES (optional)
--  libqtav found............................ YES (optional)
--  libthreadweaver found.................... YES (optional)
--  libxml2 found............................ YES (optional)
--  libxslt found............................ YES (optional)
--  libx265 found............................ YES (optional)
--  OpenGL found............................. YES (optional)
--  libqtxmlpatterns found................... YES (optional)
--  digiKam can be compiled.................. YES
-- ----------------------------------------------------------------------------------
Launch and configure Digikam
(if you’re still root, exit root before launching # digikam)
The Configuration options are pretty basic, but note that to configure the Digikam back end you’ll need to use that MariaDB socket value you got before and the user you created like so UNIX_SOCKET=/var/run/mysqld/mysqld.sock: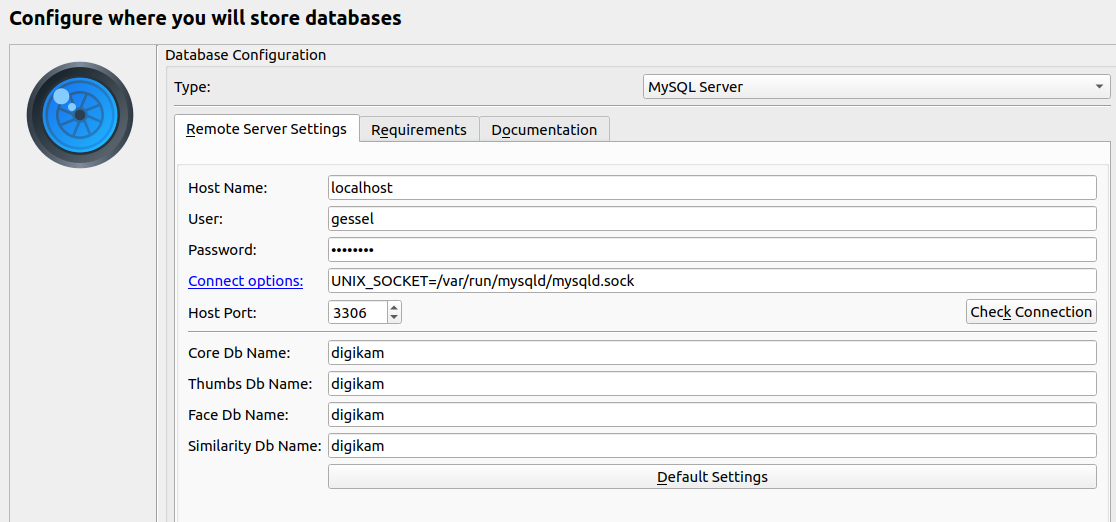
On the first run, it will download about 350mb of code for the face recognition engine. Hey – maybe a bit heavy, but you’re not giving the Google or Apple free lookie looks at all your personal pictures. Also, if all this is a bit much (and, Frankly, it is) I’d consider Digikam one of the few applications that makes the whole flatpak thing seem somewhat justified. Maybe.
Some advice on tuning:
I recommend mysqltuner highly, then maybe check this out (or just leave it default, default works well).
Tuning a database is application and computer specific, there’s no one size fits any, certainly not all, and it may change as your database grows. There are far more expert and complete tuning guides available, but here’s what I do:
Pre-Tuning Data Collection
Tuning at the most basic involves instrumenting the database to log problems, running it for a while, then parsing the performance logs for useful hints. The mysqltuner.pl script is far more expert at than I’ll ever be, so I pretty much just trust it. You have to modify your mysqld.cnf file to enable performance data collection (which, BTW, slows down operation, so undo this later) which, for MariaDB, means adding a few lines:
sudo nano /etc/mysql/mariadb.conf.d/50-server.cnf
# enable performance schema to allow optimization, but ironically hit performance, so disable after tuning.
# in the [mysqld] section insert
performance_schema=ON
performance-schema-instrument='stage/%=ON'
performance-schema-consumer-events-stages-current=ON
performance-schema-consumer-events-stages-history=ON
performance-schema-consumer-events-stages-history-long=ON
Follow the instructions for installing mysqltuner.pl at https://github.com/major/MySQLTuner-perl#downloadinstallation
I rather like this guide’s helpful instructions for putting the script in /usr/local/sbin/ so it is in the execution path:
sudo wget https://raw.githubusercontent.com/major/MySQLTuner-perl/master/mysqltuner.pl -O /usr/local/sbin/mysqltuner.pl
sudo chmod 700 /usr/local/sbin/mysqltuner.pl
sudo mysqltuner.pl
Then restart with sudo service mariadb restart then go about your business with digikam – make sure you rack up some real hours to gather useful data on your performance. Things like ingesting a large collection should generate useful data. I’d suggest doing disk tuning first because that’s hardware not load dependent.
Disk tuning
Databases tend to hammer storage and SSDs, especially SLC/enterprise SSDs, massively improve DB performance over spinning disks – unless you have a massive array of really good rotating drives. I’m running this DB on one spinning disk, so performance is very MEH. MySQL and MariaDB make some assumptions about disk performance which is used to scale some pretty important parameters for write caching. You can meaningfully improve on the defaults by testing your disk with a great linux utility called “fio”.
sudo apt install fio
fio --randrepeat=1 --ioengine=libaio --direct=1 --gtod_reduce=1 --name=test --filename=test --bs=4k --iodepth=64 --size=4G --readwrite=randrw --rwmixread=75
This will take a while and will give some very detailed information about the performance of your disk subsystem, the key parameters being average and max write IOPS. I typically create a # performance tuning section at the end of my [mysqld] section and before [embedded] and I’ll put these values in as, say: (your IOPS values will be different):
# performance tuning

innodb_io_capacity              = 170
innodb_io_capacity_max          = 286
and sudo service mariadb restart
Using mysqltuner.pl
After you’ve collected some data, there may be a list of tuning options.
sudo nano /etc/mysql/mariadb.conf.d/50-server.cnf
Mine currently look like this, but they’ll change as the database stabilizes and my usage patterns change.
# performance tuning

innodb_io_capacity              = 170
innodb_io_capacity_max          = 286

innodb_stats_on_metadata        = 0
innodb_buffer_pool_size         = 4G
innodb_log_file_size            = 512M
innodb_buffer_pool_instances    = 4
skip_name_resolve               = 1
query_cache_size                = 0
query_cache_type                = 0
query_cache_limit               = 2M
max_connections                 = 175
join_buffer_size                = 4M
tmp_table_size                  = 24M
max_heap_table_size             = 24M
innodb_buffer_pool_size         = 4G
max_allowed_packet              = 128M
and
sudo service mariadb restart
Note max_allowed_packet = 128M comes from this guide. I trust it, but it isn’t a mysqltuner suggestion.
Tagging MP3 Files with Puddletag on Linux Mint
A “fun” part of organizing an MP3 collection is harmonizing the tags so the datas work consistently with whatever management schema you prefer. My preference is management by the file system—genre/artist/year/album/tracks works for me—but consistent metainformation is required and often disharmonious. Finding metaharmony is a chore I find less taxing with a well structured tag editor and to my mind the ur-meta-tag manager is MP3TAG.
The problem is that only works with that dead-end spyware riddled failing legacyware called “Windows.” Fortunately, in Linux-land we have puddletag, a very solid clone of MP3TAG. The issues is that the version in repositories is (as of this writing) 1.20 and I couldn’t find a PPA for the latest, 2.0.1. But compiling from source is super easy and works in both Linux Mint 19 and Ubuntu 20.04 and version 2.20 on 22.04 which contains my mods to latinization of foreign scripts (yay open source!):
- Install pre-reqs to build (don’t worry, if they’re installed, they won’t be double installed)
- get the tarball of the source code
- expand it (into a reasonable directory, like ~/projects)
- switch into that directory
- run the python executable “puddletag” directly to verify it is working
- install it
- tell the desktop manager it’s there – and it should be in your window manager along with the rest of your applications.
The latest version as of this post was 2.0.1 from https://github.com/puddletag/puddletag
sudo apt install python3-pyqt5 python3-pyqt5.qtsvg python3-pyparsing python3-mutagen python3-acoustid libchromaprint-dev libchromaprint-tools libchromaprint1
wget href="https://github.com/puddletag/puddletag/releases/download/2.0.1/puddletag-2.0.1.tar.gz
tar -xvf puddletag-2.0.1.tar.gz
cd puddletag-2.0.1/
cd puddletag
./puddletag
sudo python3 setup.py install
sudo desktop-file-install puddletag.desktop
A nice feature is the configuration directory is portable and takes your complete customization with you – it is an extremely customizable program so you can generally configure it as fits your mental model. Just copy the entire puddletag directory located at ~/.configure/puddletag.
Never put important data on anyone else’s hardware. Ever.
In early January, 2021, two internet services provided unintentional and unequivocal demonstrations of the intrinsic trade-offs between running one’s own hardware and trusting “The Cloud.” Parler and Gab, two “social network” services competing for the white supremacist demographic both came under fire in the wake of a violent insurrection against the US government when the plotters used their platforms (among other less explicitly extremist-friendly services) to organize the attack.
Parler had elected to take the expeditious route of deploying their service on AWS and discovered just how literally the cloud is metaphorically like atmospheric clouds—public and ephemeral—when first their entire data set was extracted and then their services were unilaterally terminated by AWS knocking them completely offline (except, of course, for the exfiltrated data, which is still online and being combed by law enforcement for evidence of sedition.)
Gab owns their own servers and while they had trouble with their domain registrar, such problems are relatively easy to resolve: Gab remains online. Gab did face the challenge of rapid scaling as the entire right-wing extremist market searched for a safe haven away from the fragile Parler and from the timid and begrudging regulation of hate speech and calls for immediate violence by mainstream social networks in the fallout over their contributions to the insurrection and other acts of right-wing terrorism.
In general customers who engage cloud service providers rather than self-hosting do so to speed deployment, take advantage of easy scalability (up or down), and offload management of common denominator infrastructure to a large-scale provider, all superficially compelling arguments. However convenient this may seem, it is rarely a good decision and fails to rationally consider some of the intrinsic shortcomings, as Parler discovered in rather dramatic fashion, including loss of legal ownership of the data on those services, complete abdication of control of that data and service, and an intrinsic and inescapable misalignment of business interests between supplier and customer.
Anyone considering engaging a cloud service provider for a service that results in proprietary data being stored on third party hardware or on the provision of a business critical service by a third party should ensure contractual obligations with well defined penalties explicitly match the implicit expectations of privacy, stewardship, suitability of service, and continuity and that failures are actionable sufficient to make whole the client in the event of material breach.
Below is a list of questions I would have for any cloud provider of any critical service. In general, if a provider is willing to even consider answering the results will be shockingly unsatisfactory. Every company that uses a cloud service, whether it is hosting on AWS or email provisioning by Google or Microsoft is a Parler waiting to happen: all of your data exposed and then your business terminated. Cloud services are acceptable only for insecure data and for services that are a convenience, not a core requirement.
Like clouds in the sky, The Cloud is public and ephemeral.
A: A first consideration is data protection and privacy:
What liability does The Company, and employees of The Company individually, have should they sell or lose control of The Customer’s data? What compensation will The Customer receive if control of The Customer’s data is lost? Please clarify The Company’s criminal and civil liabilities and contractual obligations under the following scenarios:
1) A third party exfiltrates The Customer’s data entrusted to The Company’s care in an unauthorized manner.
2) An employee of The Company willfully misuses The Customer’s data entrusted to The Company in any way.
3) The Company disposes of equipment in a manner which makes The Customer’s data entrusted to The Company accessible to third parties.
4) The company receives a National Security Letter (NSL) requesting information pertaining to The Customer or to others who have data about The Customer on The Company’s service.
5) The company receives a warrant requesting information pertaining to The Customer or to others who have data regarding The Customer on The Company’s service.
6) The company receives a subpoena requesting information pertaining to The Customer or to others who have data regarding The Customer on The Company’s service that is opened or has been in stored on their hardware for more than 180 days.
7) The company receives a civil discovery request for information pertaining to The Customer or to others who have data regarding The Customer on The Company’s service.
8) The company sells or provides access to The Customer’s data or meta information about The Customer or The Customer’s use of The Company’s system to a third party.
9) The Company changes their terms of service at some future date in a way that is inconsistent with the terms agreed to at the time of The Customer’s engagement of the services of The Company.
10) The Company fails to inform The Customer of a breach of control of The Customer’s data.
11) The Company fails to inform The Customer in a timely manner of a change in policy regarding third party access to The Customer’s data.
12) The Company erroneously exposes The Customer’s data to third party access due to negligence or incompetence.
B: A second consideration is a serial dependency on the reliability of The Company’s service to The Customer’s activity:
By relying on The Company’s service, The Customer typically will rely on the performance and availability of The Company’s products. If The Company product fails or fails to provide service as expected, The Customer may incur losses, including direct financial losses, loss of reputation, loss of convenience, or other harms. What warranty does The Company make in the performance of their services? What recourse does The Customer have for recovery of losses should The Company fail to perform?
Please provide details on what compensation The Company will provide in the following scenarios:
1) The Company can no longer perform the agreed and expected services due to reasons beyond The Company’s control.
2) The Company’s service fails to meet expectations in way that causes a material loss to The Customer.
3) The Company suffers an extended outage or compromise of service that exceeds a reasonable or agreed maximum accepted duration.
C: A third consideration is the alignment of interests between The Customer and The Company which may not be complete and may diverge in the future:
Engagement of the services of The Company requires an investment of time and resources on the part of The Customer in excess of any fees The Company may charge to adopt The Company’s products and services. What compensation will be provided should The Company’s products fail to meet performance and utility expectations? What compensation will be provided should expenditure of resources be required to compensate for The Company’s failure to meet service expectations?
Please provide details on what compensation The Company will provide in the following scenarios:
1) The Company elects to no longer perform the agreed and expected services due to business decisions made by The Company.
2) Ownership or control of The Company changes to an entity that is not aligned with the values of The Customer and which The Customer can not support, directly or indirectly.
3) Control of The Company passes to a third party e.g. through an acquisition or change of control of the board and which results in use of The Customer’s data in a way that is unacceptable to The Customer.
4) The Company or employees of The Company are found to have engaged in behavior, speech, or conduct which is unacceptable to The Customer.
5) The Company’s products or services are found to be unacceptable to The Customer for any reason not limited to security flaws, missing features, access failures, lack of performance, etc and The Company is not able to or is unwilling to meet The Customer’s requirements in a timely manner.
If your company depends on third party provisioning of IT services, you’re just one viral tweet¹ away from being out of business. Build an IT department that knows how to use a command line and run your critical services on your own hardware.
1) “Toot” now. Any company that relied on Twitter should review this post, but given the rumors around unpaid hosting bills, the chances of recovering any losses from Twitter are dim. At least those businesses that built models around Reddit APIs share your pain.
EZ rsync cheat sheet
Rsync is a great tool – incredibly powerful for synchronizing directories, copying over a network or over SSH, an awesome way to backup a mobile device back to a core network securely and other great functions. it works better than just about anything else developed before or since, but is a command line UI that is easy to forget if you don’t use it for a while and Windows is a challenge.
This isn’t meant to be a comprehensive guide, they’re are lots of those, but a quick summary of what I find useful.
There’s one confusing thing that I have to check often to be sure it is going to do what I think it should – the trailing slash on the source. It works like this:

A quick summary of useful command options (there are many, many) is:
-v, --verbose               increase verbosity
-r, --recursive             recursive (go into subdirectories)
-c, --checksum              skip based on checksum, not mod-time & size (slow, but accurate)
-a, --archive               archive mode; equals -rlptgoD (no -H,-A,-X) (weird with SMB/CIFS)
-z, --compress              compress file data during the transfer, should help over slow links
-n, --dry-run               trial run, don't move anything
-h, --human-readable        display the output numbers in a human-readable format
-u, --update                only copy files that have different sizes and equal or later modification times (-c will enable checksum comparison)
    --progress              show the sync progress during transfer
    --exclude ".*"          exclude files starting with "."
    --remove-source-files   after synced, empty the dir (like mv/merge)
    --delete                any files in dest that aren't in source are deleted in destination (danger)
    --info=progress2 --info=name0  This yields a pretty usable one line progress meter.
I do not recommend using compression (-z) on a LAN, it’ll probably slow you down. Over a slower (typically) WAN link it usually helps, but YMMV depending on link and CPU speed. Test it with that one line progress meter if it is a long enough sync to matter – it shows transfer rate a little like this:
1,770,984,121 2% 747.54kB/s 27:46:38 xfr#2159, ir-chk=1028/28648)
If the files really have to be accurately transferred, the checksum (-c) option is critical – every copy (or at least “move”) function should include this validation, especially before deleting the original.
Favicon generation script
Favicons are a useful (and fun) part of the browsing experience. They once were simple – just an .ico file of the right size in the root directory. Then things got weird and computing stopped assuming an approximate standard ppi for displays, starting with mobile and “retina” displays. The obvious answer would be .svg favicons, but, wouldn’t’ya know, Apple doesn’t support them (neither does Firefox mobile) so for a few more iterations, it still makes sense to generate an array of sizes with code to select the right one. This little tool pretty much automates that from a starting .svg file.
There are plenty of good favicon scripts and tools on the interwebs. I was playing around with .svg sources for favicons and found it a bit tedious to generate the sizes considered important for current (2020-ish) browsing happiness. I found a good start at stackexchnage by @gary, though the sizes weren’t current recommended (per this github project). Your needs may vary, but it is easy enough to edit.
The script relies on the following wonderful FOSS tools:
- Inkscape to handle svg to png conversion
- Pngquant for png file optimization
- Imagemagick for conversion to .ico
These are available in most distros (software manager had them in Mint 19).
Note that my version leaves the format as .png – the optimized png will be many times smaller than the .ico format and png works for everything except IE<11, which nobody should be using anyway. The favicon.ico generated is 16, 32, and 48 pixels in 3 different layers from the 512×512 pixel version.
The command line options for inkscape changed a bit, the bash script below has been updated to reflect current.
Note: @Chewie9999 commented on https://github.com/mastodon/mastodon/issues/7396 that for Mastodon, the sizes needed would be generated with the following:
size=(16 32 36 48 57 60 72 76 96 114 120 144 152 167 180 192 256 310 384 512 1024)
The code below can be saved as a bash file, set execution bit, and call as ./favicon file.svg and off you go:
#!/bin/bash

# this makes the output verbose
set -ex

# collect the file name you entered on the command line (file.svg)
svg=$1

# set the sizes to be generated (plus 310x150 for msft)
size=(16 32 48 70 76 120 128 150 152 167 180 192 310 512)

# set the write director as a favicon directory below current
out="$(pwd)"
out+="/favicon"
mkdir -p $out

echo Making bitmaps from your svg...

for i in ${size[@]}; do
inkscape -o "$out/favicon-$i.png" -w $i -h $i $svg
done

# Microsoft wide icon (annoying, probably going away)
inkscape -o "$out/favicon-310x150.png" -w 310 -h 150 $svg

echo Compressing...

for f in $out/*.png; do pngquant -f --ext .png "$f" --posterize 4 --speed 1 ; done;

echo Creating favicon

convert $out/favicon-512.png -define icon:auto-resize=48,32,16 $out/favicon.ico

echo Done
Copy the .png files and .ico file generated above as well as the original .svg file into your root directory (or, if in a sub-directory, add the path below), editing the “color” of the Safari pinned tab mask icon. You might also want to make a monochrome version of the .svg file and reference that as the “mask-icon” instead, it will probably look better, but that’s more work.
The following goes inside the head directives in your index.html to load the correct sizes as needed (delete the lines for Microsoft’s browserconfig.xml file and/or Android’s manifest file if not needed.)
<!-- basic svg -->
<link rel="icon" type="image/svg+xml" href="/favicon.svg">

<!-- generics -->
<link rel="icon" href="favicon-16.png" sizes="16x16">
<link rel="icon" href="favicon-32.png" sizes="32x32">
<link rel="icon" href="favicon-48.png" sizes="48x48">
<link rel="icon" href="favicon-128.png" sizes="128x128">
<link rel="icon" href="favicon-192.png" sizes="192x192">

<!-- .ico files -->
<link rel="icon" href="/favicon.ico" type="image/x-icon" />
<link rel="shortcut icon" href="/favicon.ico" type="image/x-icon" />

<!-- Android -->
<link rel="shortcut icon" href="favicon-192.png" sizes="192x192">
<link rel="manifest" href="manifest.json" />

<!-- iOS -->
<link rel="apple-touch-icon" href="favicon-76.png" sizes="76x76">
<link rel="apple-touch-icon" href="favicon-120.png" sizes="120x120">
<link rel="apple-touch-icon" href="favicon-152.png" sizes="152x152">
<link rel="apple-touch-icon" href="favicon-167.png" sizes="167x167">
<link rel="apple-touch-icon" href="favicon-180.png" sizes="180x180">
<link rel="mask-icon" href="/favicon.svg" color="brown">

<!-- Windows -->
<meta name="msapplication-config" content="/browserconfig.xml" />
For WordPress integration, you don’t have access to a standard index.html file, and there are crazy redirects happening, so you need to append to your theme’s functions.php file with the below code snippet wrapped around the above icon declaration block (optimally your child theme unless you’re a theme developer since it’ll get overwritten on update otherwise):
/* Allows browsers to find favicons */
add_action('wp_head', 'add_favicon');
function add_favicon(){
?>
REPLACE THIS LINE WITH THE BLOCK ABOVE
<?php
};
Then, just for Windows 8 & 10, there’s an xml file to add to your directory (root by default in this example) Also note you need to select a color for your site, which has to be named “browserconfig.xml”
<?xml version="1.0" encoding="utf-8"?>
<browserconfig>
    <msapplication>
        <tile>
            <square70x70logo src="/favicon-70.png"/>
            <square150x150logo src="/favicon-150.png"/>
            <wide310x150logo src="/favicon-310x150.png"/>
            <square310x310logo src="/favicon-310.png"/>
            <TileColor>#ff8d22</TileColor>
        </tile>
    </msapplication>
</browserconfig>
There’s one more file that’s helpful for mobile compatibility, the android save to desktop file, “manifest.json“. This requires editing and can’t be pure copy pasta. Fill in the blanks and select your colors
{
"name": "",
"short_name": "",
"description": "",
"start_url": "/?homescreen=1",
"icons": [
{
"src": "/favicon-192.png",
"sizes": "192x192",
"type": "image/png"
},
{
"src": "/favicon-512.png",
"sizes": "512x512",
"type": "image/png"
}
],
"theme_color": "#ffffff",
"background_color": "#ff8d22",
"display": "standalone"
}
Check the icons with this favicon tester (or any other).
Manifest validation: https://manifest-validator.appspot.com/
CoreELEC/Kodi on a Cheap S905x Box
I got a cheap Android TV box off Amazon a while back and consolidated and it ended up being spare. One of the problems with these TV boxes is they don’t get OS updates after release and soon video apps stop working because of annoying DRM mods. I figured I’d try to switch one to Linux and see how it went. There are some complications in that these are ARM devices (not x86/x64) and getting ADB to connect is slightly complicated due to it not being a USB device. There are a few variations of the “ELEC” (Embedded Linux Entertainment Center), OpenELEC, LibreELEC, and CoreELEC (at least). CoreELEC focuses on ARM boxes and makes sense for the cheapest boxes.
What you get is a little linux-based device that boots to Kodi, runs an SMB server, and provides SSH access, basically an open source SmartTV that doesn’t spy on you. It is well suited to a media library you own, rather than rent, such as your DVD/Blu-Ray collection. Perhaps physical media will come back into vogue as the rent-to-watch streaming world fractures into a million individual subscriptions. Once moved to the FOSS world, there are regular updates and, generally, people committed to keeping things working and far better and far longer term support than OEM’s offer for random cheap android devices (or, even quite expensive ones).
A: Download the CoreELEC image:
You need to know the processor and RAM of your device – note that a lot of different brands are the same physical boxes. My “CoCoq M9C Pro” (not listed) is also sold as a “Bqeel M9C Pro” (listed) and the SOC (S905X) and RAM (1G) match, so the Bqeel image worked fine. The download helper at the bottom of the https://coreelec.org/ site got me the right file easily.
B: Image a uSD or USB device for your wee box:
I’m running Linux as my desktop so I used the LibreELEC Creator Tool and just selected the file downloaded previously. That part went easily. The only issue was that after imaging, Linux didn’t recognize the device and I had to systemctl --user restart gvfs-udisks2-volume-monitor before I could do the next step.
C: One manual file move for bootability:
ELEC systems use a “device tree” – a file with hardware descriptors that are device specific to get (most) of the random cheap peripherals working on these cheap boxes. You have to find the right one in the /Device Trees folder on your newly formatted uSD/USB device and copy it to the root directory and rename it dtb.img.
D: Awesome, now what?
Once you have your configured formatted bootable uSD/USB you have to get your box to boot off it. This is a bit harder without power/volume control buttons normally on Android devices. I have ADB set up to strip bloatware from phones. You just need one command to get this to work, reboot update, but to get it to your box is a bit of a trick.
Most of these boxes are supplied rooted, so you don’t need to do that, but you do need a command line tool and to enable ADB.
To enable ADB: navigate to the build number (usually Settings > System > About phone > Build number) and click it a bunch of times until it says “you’re a developer!” Then go to developer options and enable ADB. You can’t use it yet though because there’s no USB.
Install a Terminal Emulator for Android and enable ADB over TCP
su
setprop service.adb.tcp.port 5555
stop adbd
start adbd
Then check your IP with ifconfig and on your desktop computer run
adb connect dev.ip.add.ress:5555
(dev.ip.add.ress is the IP address of your device – like 192.168.100.46, but yours will be different)
Then execute adb reboot update from the desktop computer and the box should reboot then come up in CoreELEC.
Going back to android is as easy as disconnecting the boot media and rebooting, the android OS is still on the device.
Issue: WIFI support.
Many of these cheap devices use the cheapest WIFI chips they can and often the MFGs won’t share details with FOSS developers, so driver support is weak. Bummer, but the boxes have wired connections and wired works infinitely better anyway: it isn’t a phone, it’s attached to a TV that’s not moving around, run the damn wire and get a stable, reliable connection. If that’s not possible check the WIFI chips before buying or get a decent USB-WIFI adapter that is supported.